学んだこと、試したこと、気づいたことをまとめています。
少しだけBPも使用しています。
UI操作の基本
Unreal Motion Graphics UI デザイナ
具体的に、これが何を指しているか分かっていない。
Widget BlueprintのDesignerのことかなぁと思っている。
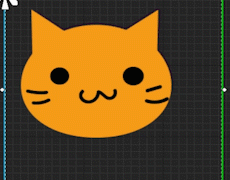
👇すごく分かりやすい。猫も可愛い。
関連
UserWidget:Widget Blueprintの親クラス。
UI:User Interface。
UX:User Experience。

実装内容
・C++でコンポーネントの操作ができるUserWidgetを作成。
手順
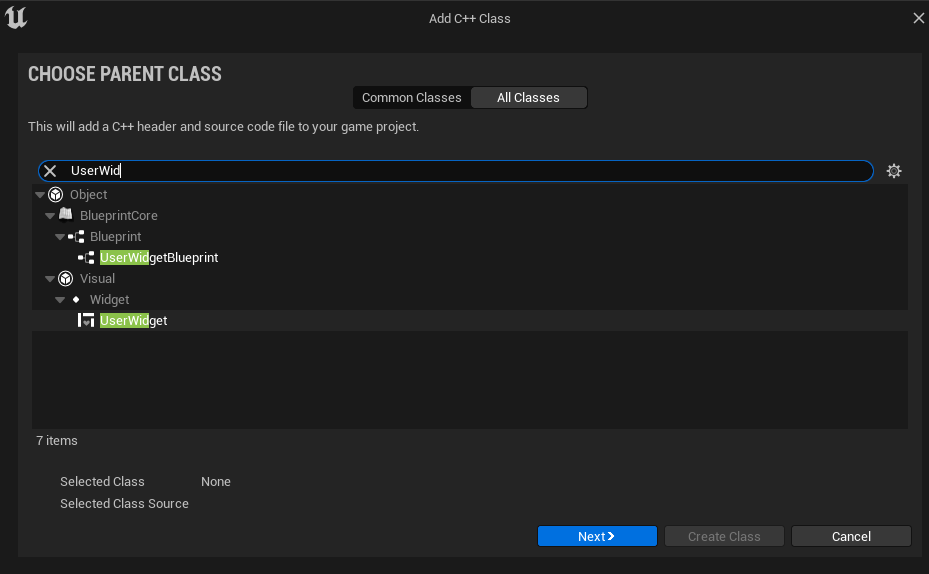
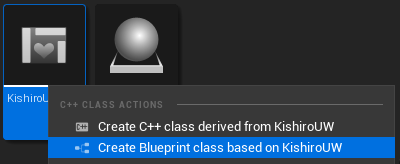
1.新しいC++クラスを追加する。親クラスはUserWidgetを選択。ここでは名前をKishiroUWとした。
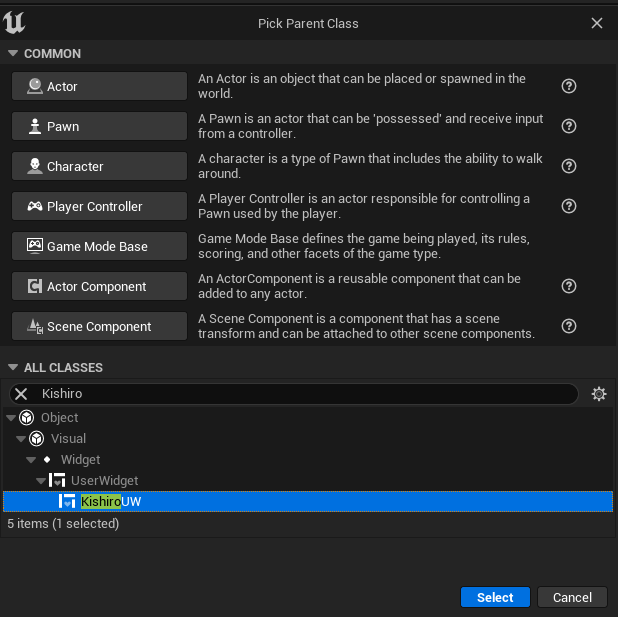
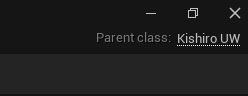
2.新しく追加したC++クラスを親としたBlueprintを作成。ここでは名前をWB_KishiroUWとした。
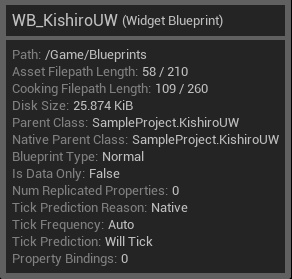
注意C++クラスから右クリックで作成すると、Designerタブが使えない。
関連
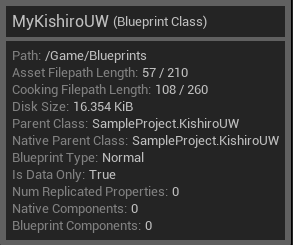
UserWidgetを親としたBPを作った後に、そのBPの親を変更して自作のC++クラスにするのでもOK。
実装内容
・C++で操作ができるコンポーネントを追加。
手順
1.コンポーネントを作成する。
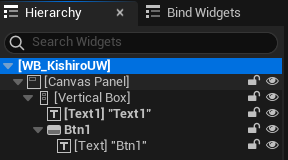
2.Is Variableにチェックを入れる。

3.C++で操作できるように変数を定義する。変数の名前が同じになるように気を付ける。
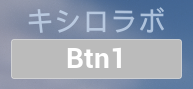
(Text1、Btn1など)
KishiroUW.h
#include "CoreMinimal.h"
#include "Blueprint/UserWidget.h"
#include "KishiroUW.generated.h"

/**
 *
 */
UCLASS()
class SAMPLEPROJECT_API UKishiroUW : public UUserWidget
{
	GENERATED_BODY()

protected:
	UPROPERTY(BlueprintReadWrite, meta=(BindWidget))
	class UTextBlock* Text1;

	UPROPERTY(BlueprintReadWrite, meta = (BindWidget))
	class UButton* Btn1;

};
Detailsパネルの右に[Open TextBlock]などと書いてある。前にUをつけたUTextBlockが変数の型になる。

実装内容
・ゲーム開始時にUIを表示させる。
手順
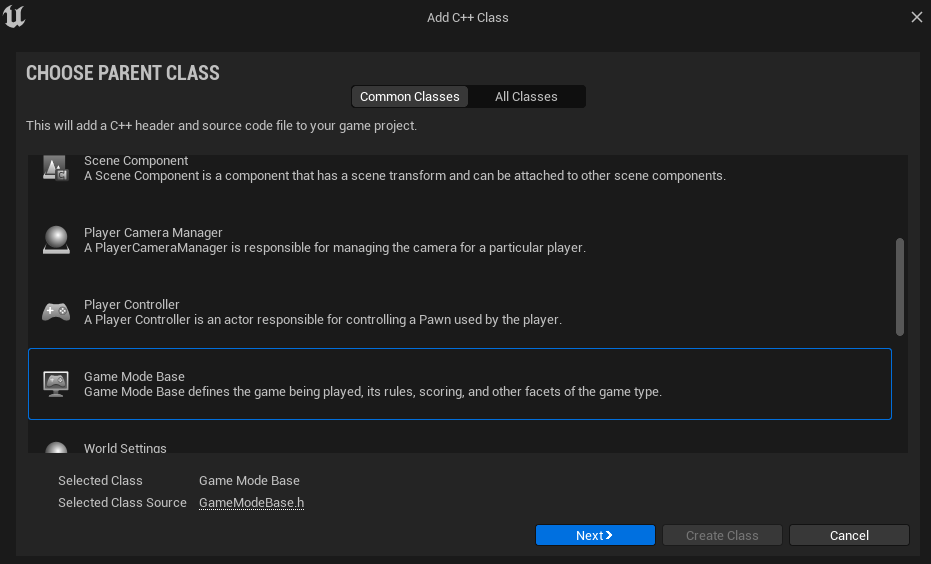
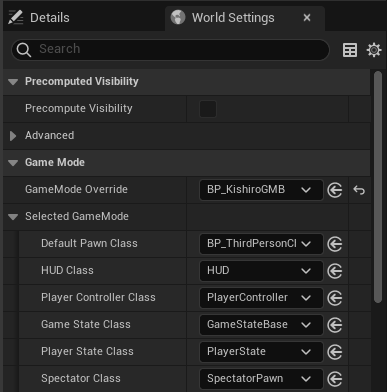
1.GameModeBaseをC++で作成する。
(名前はKishiroGMBとした。)
2.コードを書く。
KishiroGMB.h
#include "CoreMinimal.h"
#include "GameFramework/GameModeBase.h"
#include "KishiroGMB.generated.h"
/**
*
*/
UCLASS()
class SAMPLEPROJECT_API AKishiroGMB : public AGameModeBase
{
GENERATED_BODY()
protected:
UPROPERTY(EditAnywhere, Category="Class Types")
TSubclassOf<UUserWidget> WidgetClass;
UPROPERTY(VisibleInstanceOnly, Category="Runtime")
class UKishiroUW* KishiroUW;
void BeginPlay() override;
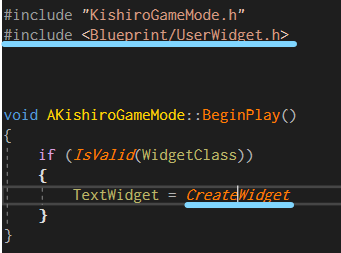
};KishiroGMB.cpp
#include "KishiroGMB.h"
#include "KishiroUW.h"
#include <UObject/UObjectGlobals.h>
void AKishiroGMB::BeginPlay()
{
if (IsValid(WidgetClass))
{
KishiroUW = Cast<UKishiroUW>(CreateWidget(GetWorld(), WidgetClass));
if (KishiroUW != nullptr)
{
KishiroUW->AddToViewport();
}
}
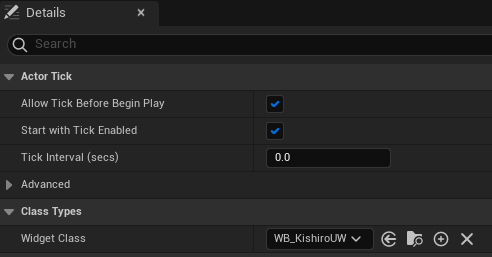
}3.KishiroGMBを親としたBPを作成。Widget ClassにWB_KishiroUWを設定。
4.BP_KishiroGMBをoverride。
実装内容
・ボタンをクリックするとテキストが変化する。
コード
KishiroUW.h
#include "CoreMinimal.h"
#include "Blueprint/UserWidget.h"
#include "KishiroUW.generated.h"

/**
 *
 */
UCLASS()
class SAMPLEPROJECT_API UKishiroUW : public UUserWidget
{
	GENERATED_BODY()

protected:
	UPROPERTY(BlueprintReadWrite, meta=(BindWidget))
	class UTextBlock* Text1;

	UPROPERTY(BlueprintReadWrite, meta = (BindWidget))
	class UButton* Btn1;

	void NativeConstruct() override;

	UFUNCTION()
	void OnClickedBtn1();

};
KishiroUW.cpp
#include "KishiroUW.h"
#include <Components/Button.h>
#include <Components/TextBlock.h>
void UKishiroUW::NativeConstruct()
{
if (Btn1)
{
Btn1->OnClicked.AddDynamic(this, &UKishiroUW::OnClickedBtn1);
}
}
void UKishiroUW::OnClickedBtn1()
{
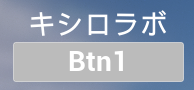
const FString OutStr = TEXT("キシロラボ");
Text1->SetText(FText::FromString(OutStr));
}
色変更など
実装内容
・Bキーで表示/非表示切り替え
・UI表示中はマウス表示、プレイヤーのInput不可。
・UI非表示中はマウス非表示、プレイヤーのInput可能。
コード
KishiroGMB.h
#pragma once

#include "CoreMinimal.h"
#include "GameFramework/GameModeBase.h"
#include "KishiroGMB.generated.h"

/**
 *
 */
UCLASS()
class SAMPLEPROJECT_API AKishiroGMB : public AGameModeBase
{
	GENERATED_BODY()
protected:
	UPROPERTY(EditAnywhere, Category="Class Types")
	TSubclassOf<UUserWidget> WidgetClass;

	UPROPERTY(VisibleInstanceOnly, Category="Runtime")
	class UKishiroUW* KishiroUW;

	void BeginPlay() override;

	void SetupInput();

	void PressedB();

	APlayerController* ControllerRef;

	ACharacter* PlayerRef;

	bool bisPressedB = false;
};
KishiroGMB.cpp
#include "KishiroGMB.h"
#include "KishiroUW.h"
#include <UObject/UObjectGlobals.h>
#include <Kismet/GameplayStatics.h>
#include <GameFramework/Character.h>

void AKishiroGMB::BeginPlay()
{

	ControllerRef = UGameplayStatics::GetPlayerController(GetWorld(), 0);

	PlayerRef = UGameplayStatics::GetPlayerCharacter(GetWorld(), 0);

	SetupInput();
}

void AKishiroGMB::SetupInput()
{
	EnableInput(ControllerRef);

	InputComponent->BindKey(EKeys::B, IE_Pressed, this, &AKishiroGMB::PressedB);
}

void AKishiroGMB::PressedB()
{
	if (!bisPressedB)
	{
		if (IsValid(WidgetClass))
		{
			KishiroUW = Cast<UKishiroUW>(CreateWidget(GetWorld(), WidgetClass));

			if (KishiroUW != nullptr)
			{
				KishiroUW->AddToViewport();
				ControllerRef->SetShowMouseCursor(true);
				PlayerRef->DisableInput(ControllerRef);
				bisPressedB = true;
			}
		}
	}
	else
	{
		if (IsValid(WidgetClass))
		{
			if (KishiroUW != nullptr)
			{
				KishiroUW->RemoveFromParent();
				ControllerRef->SetShowMouseCursor(false);
				PlayerRef->EnableInput(ControllerRef);
				bisPressedB = false;
			}
		}
	}

}
参考
SetColorAndOpacityを使用する。
引数はFSlateColorであり、Slateの追加が必要。
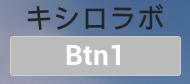
使用例「ボタンでテキスト変更」がベース。
FLinearColor(RGBAで指定。Aは無くても良い。)
void UKishiroUW::OnClickedBtn1()
{
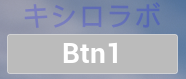
const FString OutStr = TEXT("キシロラボ");
Text1->SetText(FText::FromString(OutStr));
Text1->SetColorAndOpacity(FLinearColor(0.0f,0.0f,1.0f,0.2f));
}
FColor(RGBAで指定。Aは無くても良い。)
void UKishiroUW::OnClickedBtn1()
{
const FString OutStr = TEXT("キシロラボ");
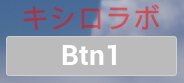
Text1->SetText(FText::FromString(OutStr));
Text1->SetColorAndOpacity(FColor(255,0,0,128));
}
FColor::FromHex(最後の2桁はAlpha情報。無くても良い。)
void UKishiroUW::OnClickedBtn1()
{
	const FString OutStr = TEXT("キシロラボ");
	Text1->SetText(FText::FromString(OutStr));
	Text1->SetColorAndOpacity(FColor::FromHex(TEXT("#99b6e1c2")));
}
EStyleColor
void UKishiroUW::OnClickedBtn1()
{
	const FString OutStr = TEXT("キシロラボ");
	Text1->SetText(FText::FromString(OutStr));
	Text1->SetColorAndOpacity(EStyleColor::AccentBlack);
}
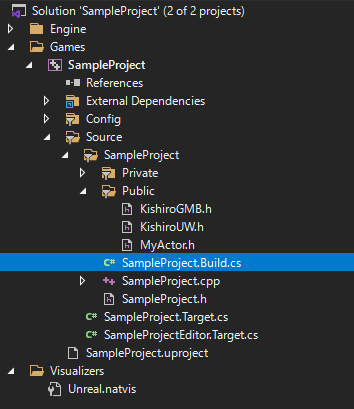
1.プロジェクト名.Build.csを選択。
2.Slateに関する部分をUncomment。
変更前
// Uncomment if you are using Slate UI
// PrivateDependencyModuleNames.AddRange(new string[] { "Slate", "SlateCore" });
変更後
// Uncomment if you are using Slate UI
PrivateDependencyModuleNames.AddRange(new string[] { "Slate", "SlateCore" });使うにはSlateの追加が必要。
/** The color and opacity of this text */
UPROPERTY(EditAnywhere, BlueprintReadWrite, Category=Appearance)
FSlateColor ColorAndOpacity;
FEditableTextStyle& SetColorAndOpacity(const FSlateColor& InColorAndOpacity) { ColorAndOpacity = InColorAndOpacity; return *this; }FSlateColorの引数のひとつに使われている。
FSlateColor(EStyleColor InColorTableId)
: SpecifiedColor()
, ColorUseRule(ESlateColorStylingMode::UseColor_ColorTable)
, ColorTableId(InColorTableId)
{ }
UENUM()
enum class EStyleColor : uint8
{
Black,
Background,
Title,
WindowBorder,
Foldout,
Input,
InputOutline,
Recessed,
Panel,
Header,
Dropdown,
DropdownOutline,
Hover,
Hover2,
White,
White25,
Highlight,
Primary,
PrimaryHover,
PrimaryPress,
Secondary,
Foreground,
ForegroundHover,
ForegroundInverted,
ForegroundHeader,
Select,
SelectInactive,
SelectParent,
SelectHover,
Notifications,
AccentBlue,
AccentPurple,
AccentPink,
AccentRed,
AccentOrange,
AccentYellow,
AccentGreen,
AccentBrown,
AccentBlack,
AccentGray,
AccentWhite,
AccentFolder,
Warning,
Error,
Success,
/** Only user colors should be below this line
* To use user colors:
* 1. Set an unused user enum value below as the color value for an FSlateColor. E.g. FSlateColor MyCustomColor(EStyleColors::User1)
* 2. Set the actual color. E.g USlateThemeManager::Get().SetDefaultColor(EStyleColor::User1, FLinearColor::White)
* 3. Give it a display name if you want it to be configurable by editor users. E.g. UStyleColorTable::Get().SetColorDisplayName(EUserStyleColor::User1, "My Color Name")
*/
User1,
User2,
User3,
User4,
User5,
User6,
User7,
User8,
User9,
User10,
User11,
User12,
User13,
User14,
User15,
User16,
MAX
};FColor FColor::FromHex( const FString& HexString )
{
int32 StartIndex = (!HexString.IsEmpty() && HexString[0] == TCHAR('#')) ? 1 : 0;
if (HexString.Len() == 3 + StartIndex)
{
const int32 R = FParse::HexDigit(HexString[StartIndex++]);
const int32 G = FParse::HexDigit(HexString[StartIndex++]);
const int32 B = FParse::HexDigit(HexString[StartIndex]);
return FColor((uint8)((R << 4) + R), (uint8)((G << 4) + G), (uint8)((B << 4) + B), 255);
}
if (HexString.Len() == 6 + StartIndex)
{
FColor Result;
Result.R = (uint8)((FParse::HexDigit(HexString[StartIndex+0]) << 4) + FParse::HexDigit(HexString[StartIndex+1]));
Result.G = (uint8)((FParse::HexDigit(HexString[StartIndex+2]) << 4) + FParse::HexDigit(HexString[StartIndex+3]));
Result.B = (uint8)((FParse::HexDigit(HexString[StartIndex+4]) << 4) + FParse::HexDigit(HexString[StartIndex+5]));
Result.A = 255;
return Result;
}
if (HexString.Len() == 8 + StartIndex)
{
FColor Result;
Result.R = (uint8)((FParse::HexDigit(HexString[StartIndex+0]) << 4) + FParse::HexDigit(HexString[StartIndex+1]));
Result.G = (uint8)((FParse::HexDigit(HexString[StartIndex+2]) << 4) + FParse::HexDigit(HexString[StartIndex+3]));
Result.B = (uint8)((FParse::HexDigit(HexString[StartIndex+4]) << 4) + FParse::HexDigit(HexString[StartIndex+5]));
Result.A = (uint8)((FParse::HexDigit(HexString[StartIndex+6]) << 4) + FParse::HexDigit(HexString[StartIndex+7]));
return Result;
}
return FColor(ForceInitToZero);
}hexadecimal:16進の
0から9で10文字。
aからfで6文字。
合わせて16文字。
関連
2進数:Binary number。または、base-two number
10進数:Decimal number。または、denary、base-ten number
16進数:Hexadecimal number。または、base sixteen number

Printfを使えばテキストの中に変数を入れられる。
使用例「ボタンでテキスト変更」がベース。
void UKishiroUW::OnClickedBtn1()
{
	int32 IntVal = 123;
	float FloatVal = 12.345f;

	const FString OutStr = FString::Printf(TEXT("整数:%06d\n浮動小数点数:%8.1f"),IntVal,FloatVal);
	Text1->SetText(FText::FromString(OutStr));
}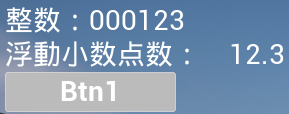
関連フォーマット指定子


\n
その他
includeが必要な関数を左クリックした後、右クリックでAdd Includeを選ぶ。
(Visual Assistの機能)
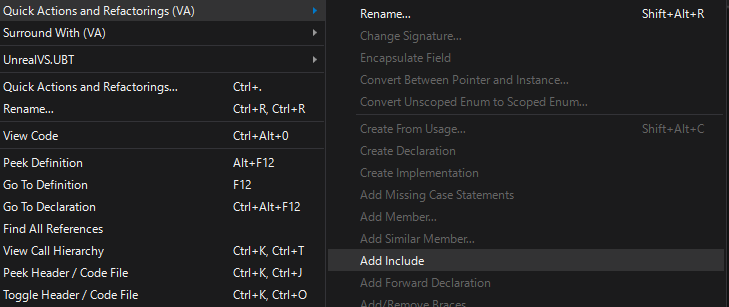
自動的に必要なものがincludeされる。便利。
TextBlockやButtonなどを作成するときはincludeの必要はなかったが、そのclassの関数を使う際にはincludeが必要だった。
ただ全てをincludeする必要もないので、エラーが出たらincludeするようにしてみる。
以前はText(” “)にいれることで、文字化けせずに使えたけど今回同じような方法で試してみたけどダメだった。
明らかなNGを下に記載。
NG
・BOM(シグネチャー)なしのUTF-8
・Shift-JIS
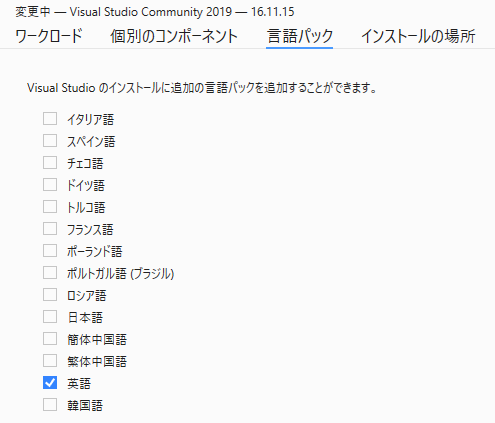
Visual Studio Installerの設定で、下の日本語にチェックを入れるとダメ。
関連


BOMのことをシグネチャーとも呼ぶらしい。
なぜかデフォルトがShift-JISになってしまったので、無理やりBOM付きのUTF-8に変換した。
1.下の文字をファイルに記入。セーブしようとするとエラー。たぶん”你”の文字をShift-JISでは扱っていないから。
你好(ニーハオ)2.Save With Other Encodingを選択。
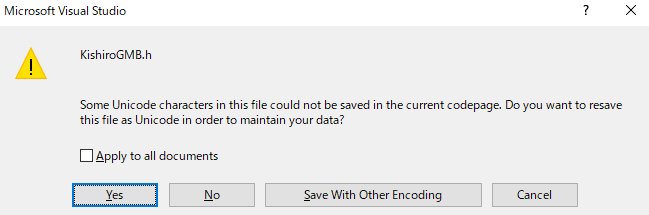
3.Unicode(UTF-8….)を選択してOK。

追記後日、このやりかたで作ってみたけど上手くいかなかった。以前構造体のところで説明したやり方の方が安全かも。

Structをつくった。たぶんEnumもつくれる。
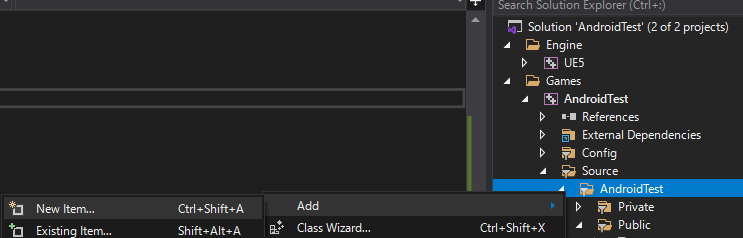
1.Souceの中のプロジェクトを右クリック。AddからNew Itemをクリック。
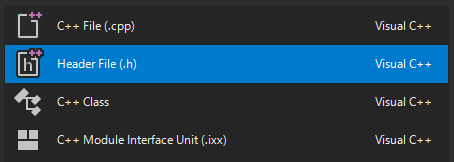
2.Header Fileを選択。
3.NameとLocationを設定してAdd。

4.コードを書く。書き方は下記の記事をどうぞ。

はじめ保存場所が他のStructやEnumと微妙に違うのが不安だったが、処理を書いているうちに同じになって安心。しっかりStructとして使うこともできた。
Visual Studioの設定。何が違うかは分かっていない。動画ではDebugGame Editorを使っていた。
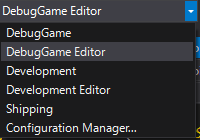
DefaultではDevelopment Editor。ずっとこれ使ってたと思う。
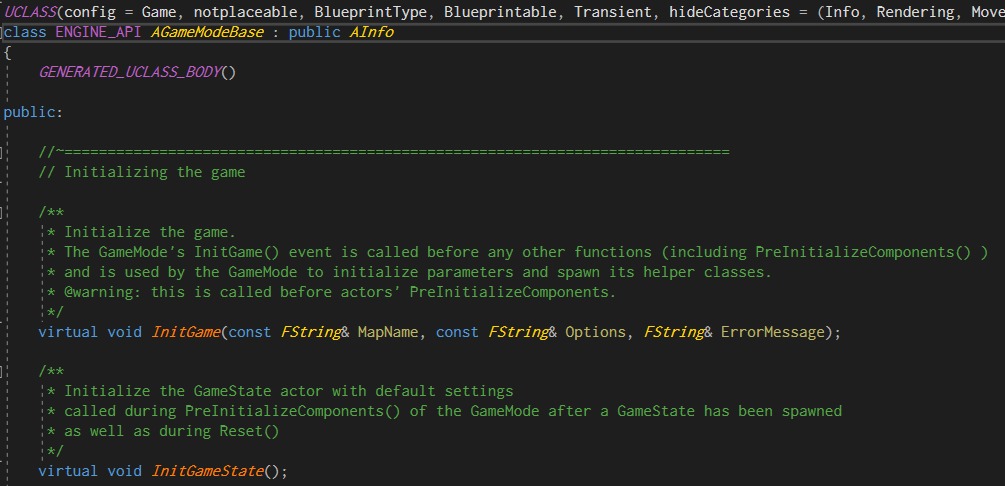
クラス名の上でクリックした後に、F12。そのクラスのプログラムが読める。
そのクラスに紐づいている関数などを確認できるのが便利だと感じた。
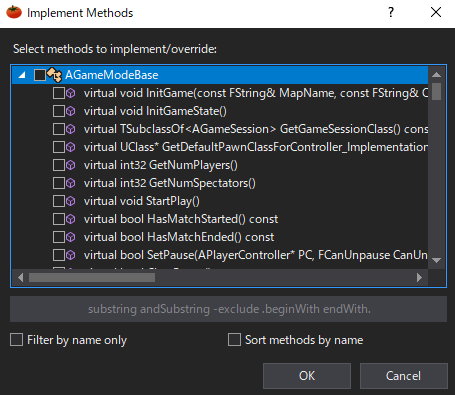
👇GameModeBaseをF12で調べたもの
使うときは右クリックからImplement Methodsが楽なとき多い。
意味:インスタンスを作成する。
発音:ˌɪˈnstænʃiˌet(米国英語)
Twitterしてます
ブログの更新をお知らせ
コメント