学んだこと、試したこと、気づいたことをまとめています。
はじめに
Enumerationの略
意味:列挙
発音:ɪn(j)ùːməréɪʃən(米国英語)
イナムと読まれることが多い。
追記(2022/10/17)
下記の「Enum作成下準備」の方法を使ったことが原因かは分かりませんが、プロジェクトを開けなくなりました。BlueprintFunctionLibraryを使えば、EnumやStructだけでなく関数も定義できるので良ければそちらを使ってください。ソースファイルを削除したりしないので、おそらく安全だと思います。記述の仕方はこの記事で書いてあることと同じです。
Struct(構造体)と同じ。
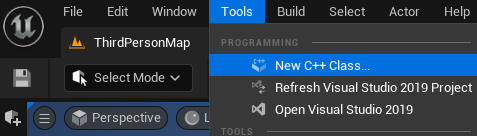
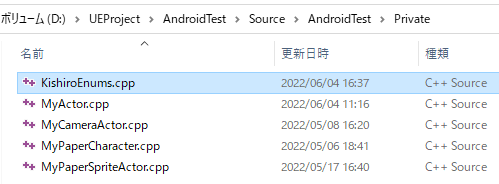
1.New C++ Class…を選択。
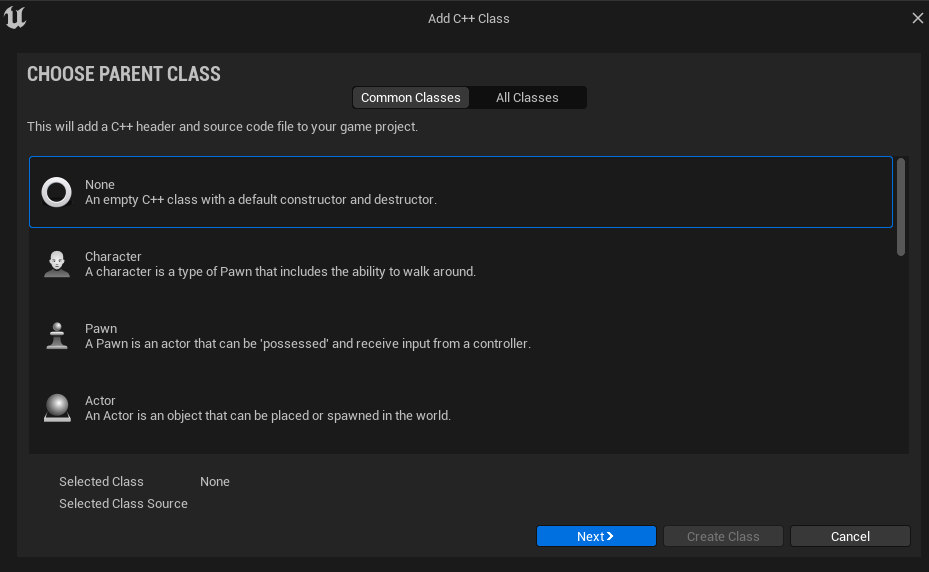
2.Noneを選択。
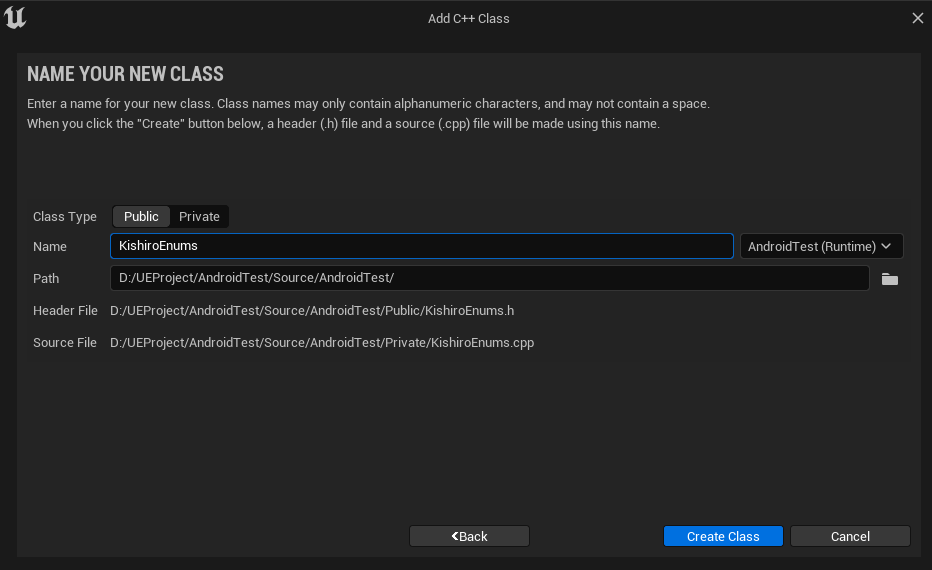
3.名前を決めてCreate Class。
4.エクスプローラーで、ソースファイルを削除。VisualStudio上のソースファイルもDeleteで削除。
STAMDARD ENUM
下記のように作成するenumを、ここではstandard enumと呼ぶ。
KishiroEnums.h
#pragma once
#include "KishiroEnums.generated.h"
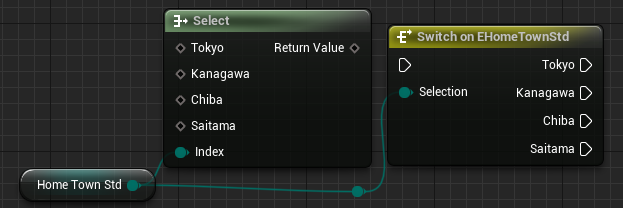
UENUM(BlueprintType, Category="KishiroProperty")
enum EHomeTownStd
{
EHT_Tokyo UMETA(DisplayName = "Tokyo"),
EHT_Kanagawa UMETA(DisplayName = "Kanagawa"),
EHT_Chiba UMETA(DisplayName = "Chiba"),
EHT_Saitama UMETA(DisplayName = "Saitama")
};enumの名前は他のものと被ってはいけない。
EHT_などのPrefixをつけることで、他のenumと被る可能性がグッと減る。
//このコードはコンパイルエラーだった
//やはり同じ名前のenumはダメ
UENUM(BlueprintType, Category="KishiroProperty")
enum EHomeTownStd
{
	EHT_Tokyo UMETA(DisplayName = "Tokyo"),
	EHT_Kanagawa UMETA(DisplayName = "Kanagawa"),
	EHT_Chiba UMETA(DisplayName = "Chiba"),
	EHT_Saitama UMETA(DisplayName = "Saitama")
};

UENUM(BlueprintType, Category = "KishiroProperty")
enum EHomeTownStd2
{
	EHT_Tokyo UMETA(DisplayName = "Tokyo"),
	EHT_Kanagawa UMETA(DisplayName = "Kanagawa"),
	EHT_Chiba UMETA(DisplayName = "Chiba"),
	EHT_Saitama UMETA(DisplayName = "Saitama")
};
enumを作るだけで、それに対応したSelectノードやSwitchノードが使えるようになる。
プレフィックス。頭につけるやつ。

standard enumを作成すると、UPROPERTYやUFUNCTIONで使用するときにTEnumAsByteを使う必要がある。ちょっと面倒だし分かりづらい。
MyActor.h
#include "KishiroEnums.h"UPROPERTY(EditAnywhere, BlueprintReadWrite)
TEnumAsByte<EHomeTownStd> HomeTownStd = EHT_Kanagawa;CLASS ENUM
下記のように作成するenumを、ここではclass enumと呼ぶ。
KishiroEnums.h
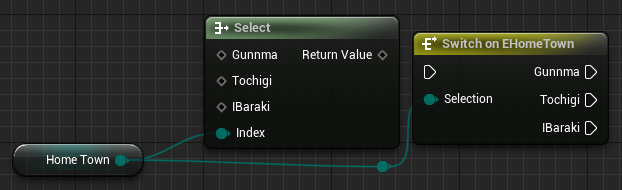
UENUM(BlueprintType, Category = "KishiroProperty")
enum class EHomeTown : uint8
{
	Gunnma UMETA(DisplayName = "Gunnma"),
	Tochigi UMETA(DisplayName = "Tochigi"),
	IBaraki UMETA(DisplayName = "IBaraki")
};
class enumなら同じ名前のenumがあっても問題ないので、prefixをつける必要がない。
//これはコンパイルエラーにならない
//クラスが分かれているから同じ名前でもOK
UENUM(BlueprintType, Category = "KishiroProperty")
enum class EHomeTown : uint8
{
	Gunnma UMETA(DisplayName = "Gunnma"),
	Tochigi UMETA(DisplayName = "Tochigi"),
	IBaraki UMETA(DisplayName = "IBaraki")
};

UENUM(BlueprintType, Category = "KishiroProperty")
enum class EHomeTown2 : uint8
{
	Gunnma UMETA(DisplayName = "Gunnma"),
	Tochigi UMETA(DisplayName = "Tochigi"),
	IBaraki UMETA(DisplayName = "IBaraki")
};
enumを作るだけで、対応したSelectノードやSwitchノードが使えるようになる。
MyActor.h
#include "KishiroEnums.h"UPROPERTY(EditAnywhere, BlueprintReadWrite)
EHomeTown HomeTown = EHomeTown::IBaraki;BITFLAGS ENUM
下記のように作成するenumを、ここではbitflags enumと呼ぶ。
int型に変換することができるのが特徴。
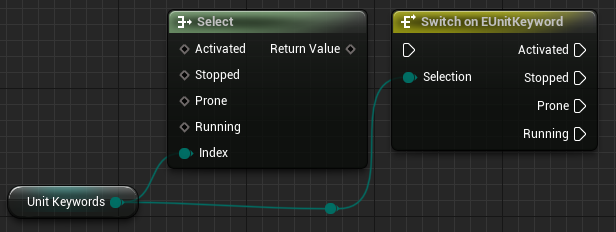
UENUM(BlueprintType, Meta = (Bitflags))
enum class EUnitKeyword : uint8
{
	None = 0 UMETA(Hidden),
	Activated = 1 UMETA(DisplayName = "Activated"),
	Stopped = 2 UMETA(DisplayName = "Stopped"),
	Prone = 4 UMETA(DisplayName = "Prone"),
	Running = 8 UMETA(DisplayName = "Running")
};
2進数表記
None      =00000000
Activated =00000001
Stopped   =00000010
Prone     =00000100
Running   =00001000
enumをつくるだけで、対応したSelectノードやSwitchノードが作られる。
列挙型とint型の2種類の作成方法がある。
列挙型class enumと同じ使い方
MyActor.h
UPROPERTY(EditAnywhere, BlueprintReadWrite)
EUnitKeyword UnitKeyword = EUnitKeyword::Activated;int型ビット演算できる。複数のenumを持てる。
MyActor.h
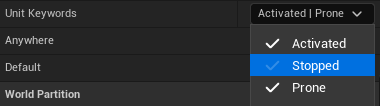
UPROPERTY(EditAnywhere, BlueprintReadWrite, meta = (Bitmask, BitmaskEnum = "EUnitKeyword"))
	uint8 UnitKeywords = static_cast<uint8>(EUnitKeyword::Activated);
2つ以上の状態を同時に満たすことができる。キャラクターの状態異常とかに使えるかなぁ。
例
ActiveかつRunning=00001001
StoppedかつProne=00000110
(列挙型)                ➡(uint8)
EUnitKeyword::None      ➡00000000
EUnitKeyword::Activated ➡00000001
EUnitKeyword::Stopped   ➡00000010
EUnitKeyword::Prone     ➡00000100
EUnitKeyword::Running   ➡00001000
👇Detailsパネル
注意
SelectノードやSwitchノードは列挙型では使えるが、int型では使えない。
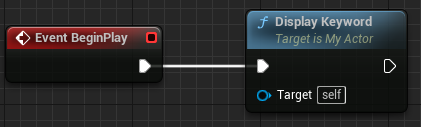
UnitKeywordをOutputLogに表示するノード
MyActor.h
UPROPERTY(EditAnywhere, BlueprintReadWrite, meta = (Bitmask, BitmaskEnum = "EUnitKeyword"))
	uint8 UnitKeywords = static_cast<uint8>(EUnitKeyword::Activated);
MyActor.cpp
void AMyActor::DisplayKeyword()
{


	if (UnitKeywords & static_cast<uint8>(EUnitKeyword::Activated))
	{
		UE_LOG(LogTemp, Warning, TEXT("Actor is Activated"))
	}

	if (UnitKeywords & static_cast<uint8>(EUnitKeyword::Stopped))
	{
		UE_LOG(LogTemp, Warning, TEXT("Actor is Stopped"))
	}

	if (UnitKeywords & static_cast<uint8>(EUnitKeyword::Prone))
	{
		UE_LOG(LogTemp, Warning, TEXT("Actor is Prone"))
	}

	if (UnitKeywords & static_cast<uint8>(EUnitKeyword::Running))
	{
		UE_LOG(LogTemp, Warning, TEXT("Actor is Running"))
	}
}
今回UnitKeywordの初期値がActivatedなので、OutputLogには次のように表示される。

初期値に整数をそのまま代入することも可能。
例えば15を代入すると、
UPROPERTY(EditAnywhere, BlueprintReadWrite, meta = (Bitmask, BitmaskEnum = "EUnitKeyword"))
	uint8 UnitKeywords = 15;
OutputLogには次のように表示される。
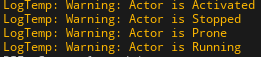
これは、15を2進数になおしたものが、
00001111
であることに起因する。
関連今回定義したEnum
(列挙型)                ➡(uint8)
EUnitKeyword::None      ➡00000000
EUnitKeyword::Activated ➡00000001
EUnitKeyword::Stopped   ➡00000010
EUnitKeyword::Prone     ➡00000100
EUnitKeyword::Running ➡00001000指定したKeywordを持っているか確かめるノード
MyActor.h
// Check whether the actor has the keyword
UFUNCTION(BlueprintPure, Category = "Actor Functions")
bool HasKeyword(EUnitKeyword InKey);
MyActor.cpp
bool AMyActor::HasKeyword(EUnitKeyword InKey)
{
	return (UnitKeywords & static_cast<uint8>(InKey)) ? true : false;
}
条件演算子を使ってみた。
//条件がYesならA、NoならBを返す。
(条件) ? A : B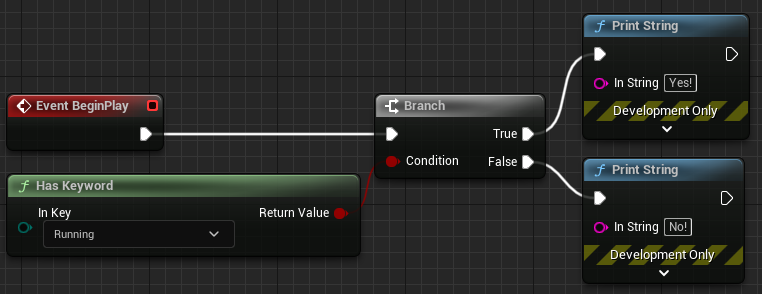
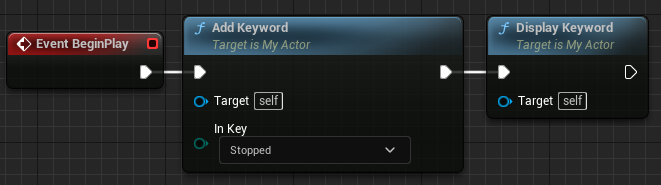
UnitKeywordを追加するノード
MyActor.h
// Add a UnitKeyword
UFUNCTION(BlueprintCallable, Category = "Actor Functions")
void AddKeyword(EUnitKeyword InKey);
MyActor.cpp
void AMyActor::AddKeyword(EUnitKeyword InKey)
{
	UnitKeywords |= static_cast<uint8>(InKey);
}
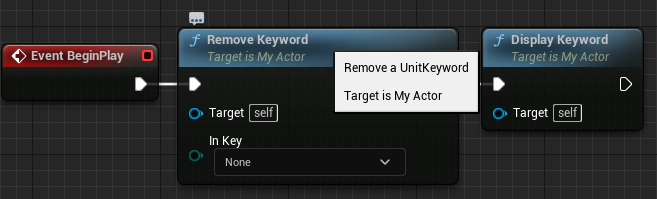
指定したKeywordを取り除くノード
MyActor.h
// Remove a UnitKeyword
UFUNCTION(BlueprintCallable, Category = "Actor Functions")
void RemoveKeyword(EUnitKeyword InKey);
MyActor.cpp
void AMyActor::RemoveKeyword(EUnitKeyword InKey)
{
	UnitKeywords &= ~static_cast<uint8>(InKey);
}
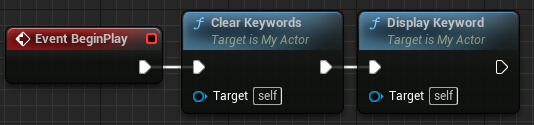
全てのKeywordを取り除く。
MyActor.h
UFUNCTION(BlueprintCallable, Category = "Actor Functions")
void ClearKeywords() { UnitKeywords = 0; };
ヘッダファイルに関数の処理を書くこともできる。
全てのkeywordを追加する。
MyActor.h
// Add All keywords
UFUNCTION(BlueprintCallable, Category = "Actor Functions")
void AddAllKeywords() { UnitKeywords = 255; };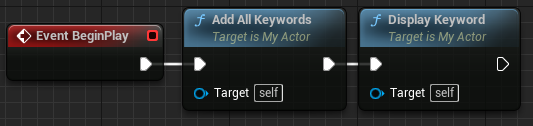
基礎知識
今回のbitflags enumの例でいうと列挙型からuint8に変換すること。
テキストデータ(人間が読めるデータ)からバイナリデータ(普通の人間には読めないデータ)に変換。
バイナリデータにすることで、ビット演算ができる。
(列挙型 )               ➡(uint8)
EUnitKeyword::None      ➡00000000
EUnitKeyword::Activated ➡00000001
EUnitKeyword::Stopped   ➡00000010
EUnitKeyword::Prone     ➡00000100
EUnitKeyword::Running   ➡00001000
人間には読むことが難しい、2進数のデータだと理解。
(binary意味2進法の)
PCで扱っているのは全てバイナリデータだけど、人間にとって読みやすい形になっているのがテキストデータってことかな。


1の補数。(0と1を入れ替える。ビット反転。)
例
static_cast<uint8>(EUnitKeyword::Activated)上のコードが表しているのは00000001。
~static_cast<uint8>(EUnitKeyword::Activated);~をつけると、11111110を表す。
👇補数についての解説。

ビットごとのAND代入。狙った桁のみを0にするのに使える。
左辺 &= 右辺;左辺と右辺のAND計算の結果を左辺に代入する。
例EUnitKeyword
UnitKeywords &= ~static_cast<uint8>(EUnitKeyword::Activated);ここで右辺は、Activated(00000001)の1の補数なので11111110を表している。
左辺のUnitKeywordsの初期値を(00000101)とすると、
左辺 00000101
右辺 11111110
AND計算は両方1なら1になり、そうでなければ0になる計算なので、
ビット(各桁)ごとの計算結果は、
結果 00000100
となる。
ここで注目すべきは、右辺のActivatedが指し示している1桁目である。
&=と~とを併用することで、他の桁の値を変えずに狙った桁のみを0(OFF)にすることができる。
青色の部分は変化せずに、赤色の部分だけ変化しているのが分かる。
関連EUnitKeyword
None      =00000000
Activated =00000001
Stopped   =00000010
Prone     =00000100
Running =00001000ビットごとの包括的OR代入。狙った桁のみを1にするのに使える。
左辺 |= 右辺;左辺と右辺のOR計算の結果を左辺に代入する。
例EUnitKeyword
UnitKeywords |= ~static_cast<uint8>(EUnitKeyword::Prone);ここで右辺はProneなので、00000100を表している。
左辺のUnitKeywordの初期値を(00001001)とすると、
左辺 00001001
右辺 00000100
OR計算は両方0なら0になり、そうでなければ1になる計算なので、
ビット(各桁)ごとの計算結果は、
結果 00001101
となる。
ここで注目すべきは、右辺のProneが指し示している3桁目である。
|=を使用することで、他の桁の値を変えずに狙った桁のみを1(ON)にすることができる。
青色の部分は変化せずに、赤色の部分だけ変化しているのが分かる。
関連EUnitKeyword
None      =00000000
Activated =00000001
Stopped   =00000010
Prone     =00000100
Running =00001000意味:ビット毎、ビット単位
&=:ビットごとのAND代入
|=:ビットごとの包括的OR代入
~:1の補数
包含的論理和。多分これが普通のOR。Inclusive OR(IOR)ともいう。
排他的論理和。XOR。Exclusive OR。
👇ビット演算について

👇ビットマスクについて

その他
UEのエディタ上で、早く問題なくやる方法。
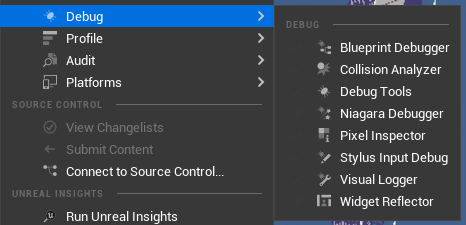
1.Tools>DebugからModulesを選びチェックを入れる。
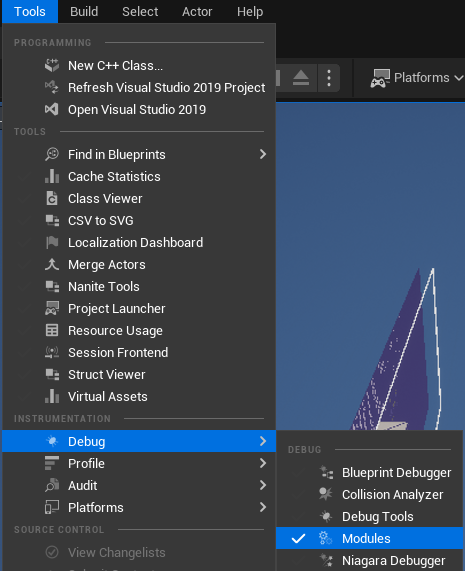
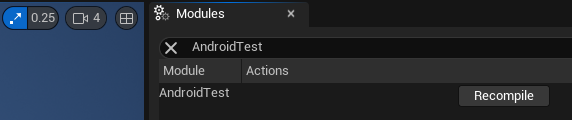
2.操作しやすい場所に配置し、プロジェクト名を検索。Recompileを押す。
以後、Recompileを押すだけでOK。
関連1UEのエディタ右下のボタン。
コンパイル失敗しやすい。他の方法で上手くいく場合も失敗する。ちゃんとコンパイルされてないときもある。

関連2Visual Studioで実行
UEのエディタを立ち上げなおすので時間がかかる。
関連3後日、Modulesが消えた。右下のボタンでコンパイルすることにする。
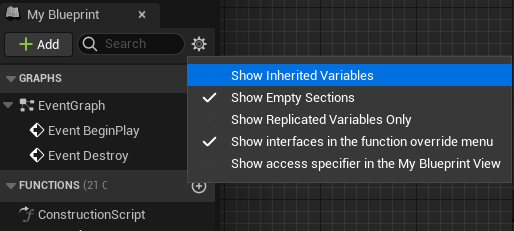
BPを開き、MyBlueprintパネルの歯車のマークをクリックして、Show Inherited Variablesを選択。

Twitterしてます
ブログの更新をお知らせ
コメント