
実際につくってみて、学んだこと試したこと気づいたことなどをまとめています。
UFUNCTION SPECIFIERS
BlueprintCallable
左右に実行ピンを持った、青いノードをつくる。
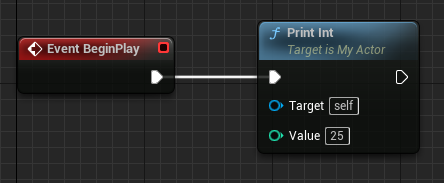
整数をスクリーン上に表示
ヘッダーファイルの関数名にマウスを合わせ、右クリックすることで選択できる。
ソースファイルに処理を作成するためのテンプレートを自動的に作ってくれる。
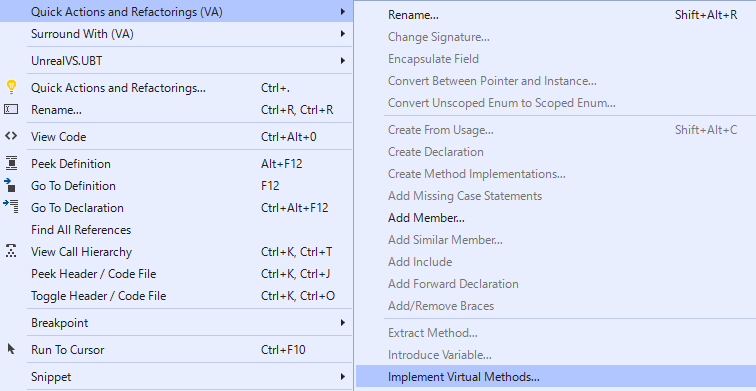
右クリック>Quick Actions and Refactorings(VA)
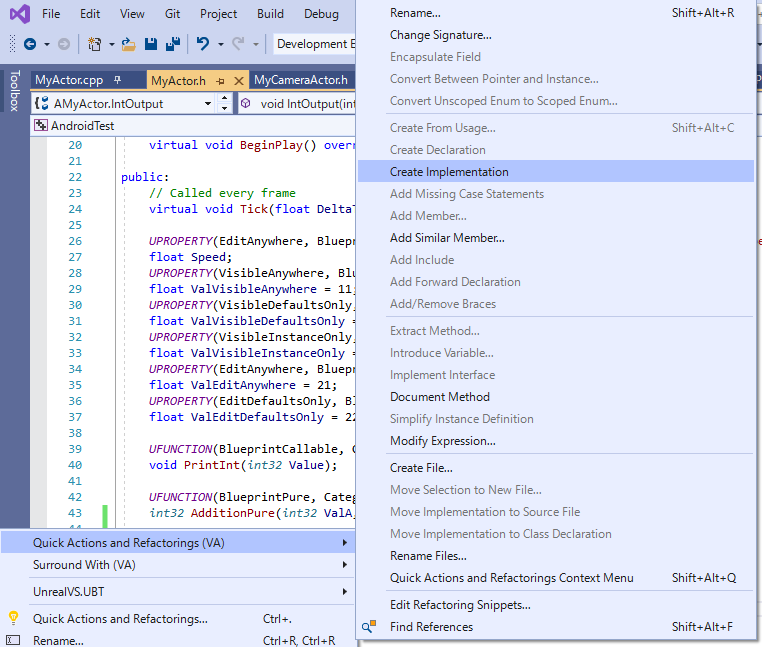
たぶん、有料ソフトのVissual Assistを使っていないと無理。
MyActor.h
public:
UFUNCTION(BlueprintCallable, Category="Actor Functions")
void PrintInt(int32 Value);
MyActor.cpp
void AMyActor::PrintInt(int32 value)
{
	UKismetSystemLibrary::PrintString(this, FString::Printf(TEXT("Print Int %d"), value), true, true, FColor::Red, 10.0f);
}
結果

BlueprintPure
実行ピンがない、緑色のノードをつくる。
実行ピンのないノードには2種類の作り方がある
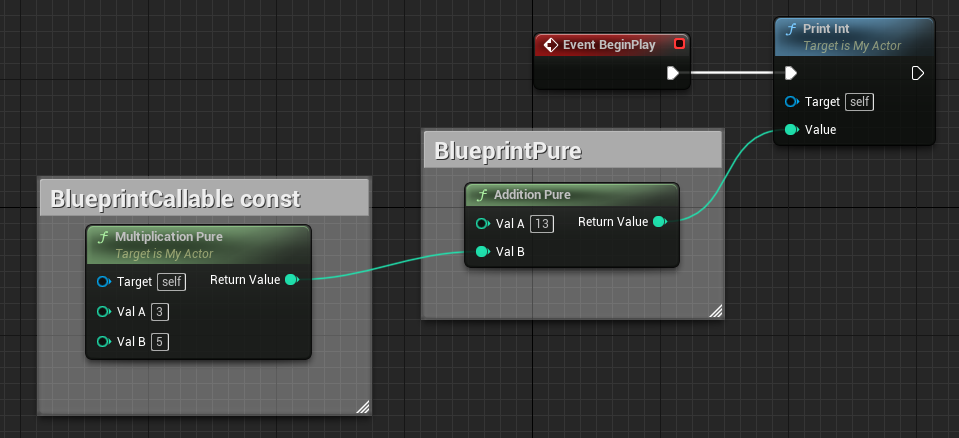
実行ピンのないノードBlueprintPureとBlueprintCallable+const。
MyActor.h
UFUNCTION(BlueprintPure, Category="Actor Functions")
	int32 AdditionPure(int32 ValA, int32 ValB);

	UFUNCTION(BlueprintCallable, Category="Actor Functions")
	int32 MultiplicationPure(int32 ValA, int32 ValB) const;
MyActor.cpp
int32 AMyActor::AdditionPure(int32 ValA, int32 ValB)
{
	return ValA + ValB;
}

int32 AMyActor::MultiplicationPure(int32 ValA, int32 ValB) const
{
	return ValA * ValB;
}
結果

BlueprintImplementableEvent
C++では処理を実装できない。
C++によってイベントが呼び出される。
カスタムイベントのようにふるまう。
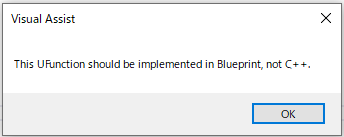
Create Implement Eventでイベントを実装しようとしたら、下のポップアップがでた。C++では処理を実装できないので。
👇分かりやすい。分かった気になれた。BlueprintImplementEventは、オーバーライドと関係があるらしい。

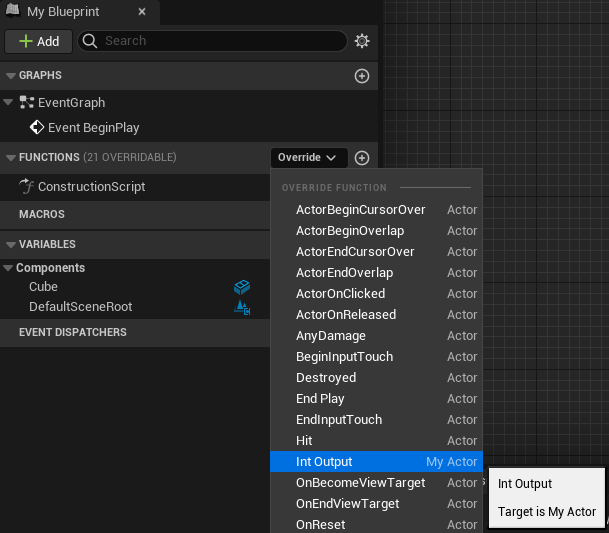
①Event Graphで右クリック。良くやるやつ。

②FUNCTIONSの右のプラスボタンにホバーすると、Overrideのプルダウンメニューが現れる。
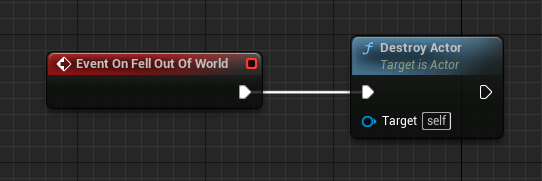
例1:キルZ時(落下したとき)にアクターを破壊。
クラス名を右クリック>Quick Actions and Refactorings>Implement Virtual Method
Visual Assist(有料)の機能。クラスで使える関数を呼び出せる。
↓検索して、チェックをいれてOK。
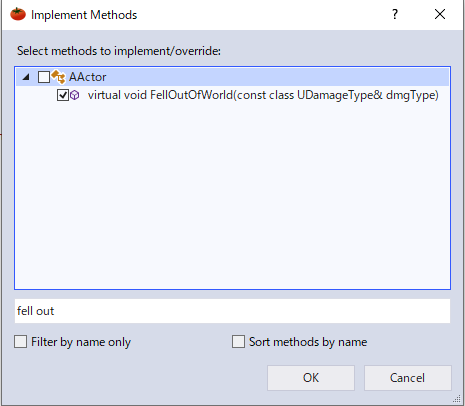
↓自動的にコードが作成される。
ヘッダファイル

ソースファイル

FellOutOfWorldの関数自体は、Implement Virtual Methodをつかったら簡単にコードを記述できる。Visual Assistなどがなくても、直接打てば問題ない。
MyActor.h
public:
void FellOutOfWorld(const class UDamageType& dmgType) override;

UFUNCTION(BlueprintImplementableEvent, Category = "Actor Functions")
void OnFellOutOfWorld();
MyActor.cpp
void AMyActor::FellOutOfWorld(const class UDamageType& dmgType)
{
	OnFellOutOfWorld();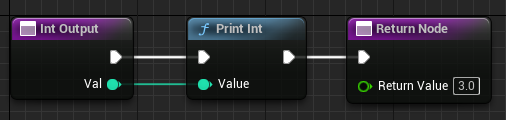
}例2:プレイ開始時、設定した数値(27)をスクリーン上に表示。
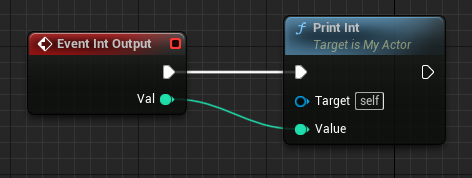
MyActor.h
UFUNCTION(BlueprintImplementableEvent, Category = "Actor Functions")
void IntOutput(int32 Val);
MyActor.cpp
void AMyActor::BeginPlay()
{
	Super::BeginPlay();
	IntOutput(27);
}
結果

関数の戻り値の型を変更する。
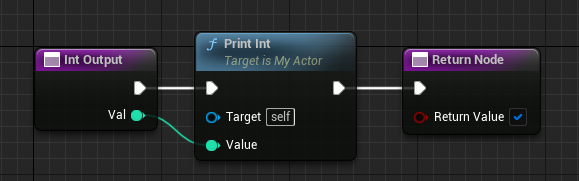
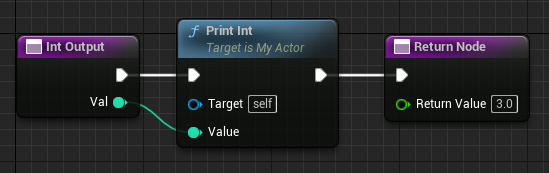
変数の型を与えると、カスタムイベントではなく、関数になる。
👇boolの場合
UFUNCTION(BlueprintImplementableEvent, Category = "Actor Functions")
bool IntOutput(int32 Val);
設定した戻り値をどのように使えるかは分からない。イベントグラフに関数を配置できなかったので。C++で使うのかな。
BlueprintNativeEvent
準備
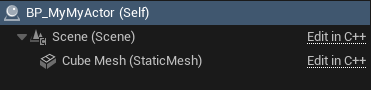
シーンコンポーネントと、スタティックメッシュの追加
今の僕の理解としては下記。
・クラスと同じ名前の関数
・Event BeginPlayより先に実行される
(参考)
AMyActor::AMyActor()
{

Scene = CreateDefaultSubobject<USceneComponent>(TEXT("Scene"));
CubeMesh = CreateDefaultSubobject<UStaticMeshComponent>(TEXT("StaticMesh"));

Scene->SetupAttachment(GetRootComponent());
CubeMesh->SetupAttachment(Scene);

}
👇よくお世話になっているサイト様による解説

MyActor.h
protected:

UPROPERTY(VisibleAnywhere,BlueprintReadOnly, Category="Components")
USceneComponent* Scene;

UPROPERTY(VisibleAnywhere,BlueprintReadOnly, Category="Components")
UStaticMeshComponent* CubeMesh;MyActor.cpp(コンストラクタに記述)
AMyActor::AMyActor()
{

Scene = CreateDefaultSubobject<USceneComponent>(TEXT("Scene"));
CubeMesh = CreateDefaultSubobject<UStaticMeshComponent>(TEXT("StaticMesh"));

Scene->SetupAttachment(GetRootComponent());
CubeMesh->SetupAttachment(Scene);
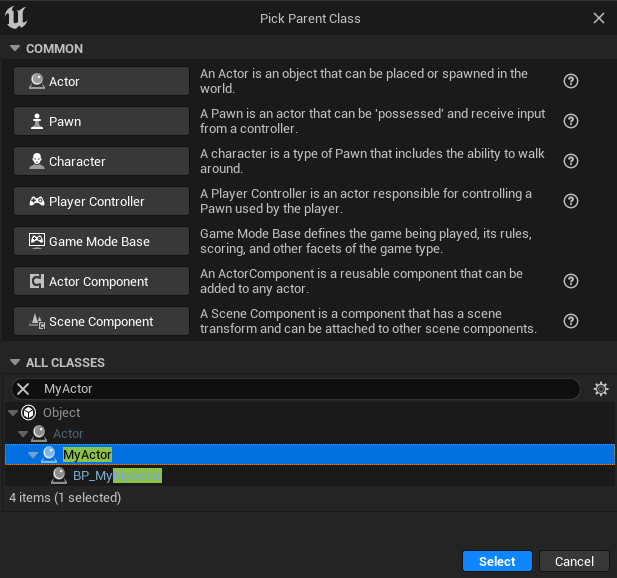
}1.親にしたいC++クラスを右クリック。
2.Create Blueprint class based on “親にしたいC++クラス”を選択。

Content Drawerで右クリック>Blueprint Classを選択。
Parent ClassをAll CLASSESから検索して、親にしたいC++クラスを選ぶ。
左右に往復移動
MyActor.h
(protected)
UPROPERTY(VisibleAnywhere, BlueprintReadWrite, Category = "MyActor")
bool bIsRight;

UPROPERTY(VisibleAnywhere, BlueprintReadWrite, Category = "MyActor")
float LeftLimit;

UPROPERTY(VisibleAnywhere, BlueprintReadWrite, Category = "MyActor")
float RightLimit;

UPROPERTY(EditAnywhere, BlueprintReadWrite, Category = "MyActor")
float Length;

UPROPERTY(VisibleAnywhere, BlueprintReadWrite, Category = "MyActor")
float CurrentX;

UPROPERTY(EditAnywhere, BlueprintReadWrite, Category = "MyActor", meta = (Tooltip = "the speed of the actor", ClampMin = "20", ClampMax = "100"))
float Speed;
MyActor.cpp
(コンストラクタ)
Speed = 50;
Length = 200;
(BeginPlay)
const FVector Location = GetActorLocation();
CurrentX = Location.X;
LeftLimit = Location.X;
RightLimit = Location.X + Length;
bIsRight = true;
(Tick)
Super::Tick(DeltaTime);

const float Val = DeltaTime * Speed;

if (bIsRight)
{
	CurrentX = CurrentX + Val;
}
else
{
	CurrentX = CurrentX - Val;
}

FVector Location = GetActorLocation();
Location.X = CurrentX;

SetActorLocation(Location);

if (CurrentX > RightLimit)
{
	bIsRight = false;
}
else if (CurrentX < LeftLimit)
{
	bIsRight = true;
}
BlueprintNativeEvent
・Blueprintで処理を上書き(オーバーライド)できるが、もともと処理を持っている。
・もともと持っている処理をここではImplementation Functionと呼ぶ。
・Implementation Functionは、関数名の末尾に”_implementation”とつけた関数で追加できる。
・オーバーライドされていなければ、Implementation Functionが実行される。
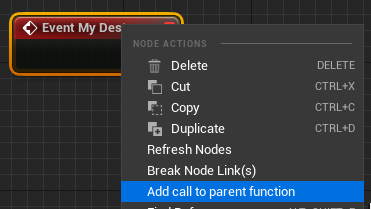
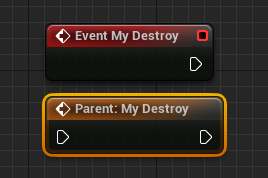
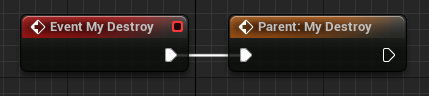
・オーバーライドされているとき、Implementation Functionを実行するにはParent Functionを作成して処理の中に追加すればいい。
右クリック>Add call to parent function
(注意)
Native Event(My Destroy)を作成して、他のノードにつなげずに実行したらクラッシュした。
他のノードに繋げれば問題なく実行され、Parent Functionに繋げなくても問題はなかった。
Native Eventを作成しなければ、Parent Functionの処理だけを実行。
(関連)
子のブループリントを作ったとき、BeginPlayなどにデフォルトで接続されているノードも確かParent Function。
作り方が分からなかったので、親の処理を作りなおしていた。BeginPlayで右クリックすればParent Functionを作成できる。
・親が持っている関数。
・Implementation Functionで処理を追加(or上書き?)できる。
・Implementation Functionを作るには、BlueprintNativeEventにする。
正しいかどうか試してはいないので、いつか試す。
BlueprintNativeEventではなくても、Parent Function自体は作れた。
移動してから消える
Blueprintは何も記述しないで大丈夫。
👇何も記述しなければ、この処理が実行される。
MyActor.h
UFUNCTION(BlueprintNativeEvent, Category="Actor Functions")
void MyDestroy();
void MyDestroy_Implementation();
MyActor.cpp
MyDestroy_Implementation
void AMyActor::MyDestroy_Implementation()
{
	this->Destroy();
}
Tick(右に移動した後の処理に追記)
if (CurrentX > RightLimit)
{
	bIsRight = false;
	MyDestroy();
}
移動して落下してから消える
👇Parent Functionとの間に処理を挟むことができる。Parent Functionは入れなくても大丈夫。
ただしNative Event(My Destroy)を作って、なにも処理を書かないとクラッシュする。

META TAG
記述の型
DisplayName="名前"自作の関数名をDestroyにするとクラッシュした。C++において、もともと設定されている関数名だからだと思う。関数名ではなくDisplayNameをDestroyと設定するのなら問題ない。
例
MyActor.h
UFUNCTION(BlueprintNativeEvent, Category="Actor Functions", meta=(DisplayName="Destroy"))
void MyDestroy();
void MyDestroy_Implementation();
記述の型
ToolTip="説明"ノードにマウスホバーした際にでる説明を記述できる。
例
MyActor.h
UFUNCTION(BlueprintNativeEvent, Category="Actor Functions", meta=(DisplayName="Destroy", ToolTip="The actor is destroyed when it reach the right limit."))
void MyDestroy();
void MyDestroy_Implementation();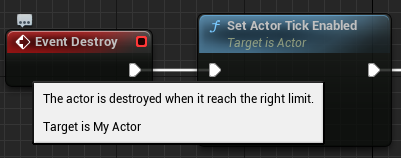
記述の型
ShortToolTip="何か"マウスホバーで表示されるわけではないらしい。いつどこで表示されるのか知りたい。見つかったら追記します。
例
MyActor.h
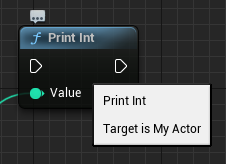
UFUNCTION(BlueprintCallable, Category="Actor Functions", meta=(HideSelfPin="true", ShortToolTip="Print the integer to the screen."))
void PrintInt(int32 Value);
ちなみにTEXT(” “)をつかって日本語を表示させようとしたが、コンパイルでエラーが出て無理だった。
記述の型
HideSelfPin="true"Selfピンを消すことができる。Target(Self)のピン。
例
MyActor.h
UFUNCTION(BlueprintCallable, Category = "Actor Functions", meta=(HideSelfPin="true"))
int32 MultiplicationPure(int32 ValA, int32 ValB) const;
👇BlueprintCallableで作ったのにSelf Pinがない。
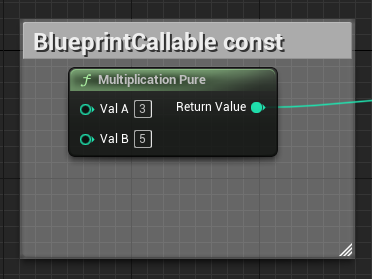
(参考)デフォルトではBlueprintCallableにはSelf Pinがある。
FUNCTION PARAMETERS
記述の型
const 型名 変数名設定した変数が変化するとコンパイル時にエラーが出てくれる。
変化させたくない変数に対して設定する。
👇コンパイル時にエラー。
void AMyActor::PrintInt(const int32 value)
{
	value = 3;
	UKismetSystemLibrary::PrintString(this, FString::Printf(TEXT("Print Int %d"), value), true, true, FColor::Red, 10.0f);
}
(Valueに3を代入して、変数の値を変化させてしまっている)
👇これはコンパイル成功。constつけてないから。
void AMyActor::PrintInt(int32 value)
{
value = 3;
UKismetSystemLibrary::PrintString(this, FString::Printf(TEXT("Print Int %d"), value), true, true, FColor::Red, 10.0f);
}記述の型
型名& 変数名Outputピンの変数の型と変数名を設定できる。複数記述することで、複数のOutputピンを持たせることも可能。
例整数を2乗するノード
MyActor.h
UFUNCTION(BlueprintCallable, Category = "Actor Functions", meta = (HideSelfPin = "true", ToolTip = "Square the Integer."))
void SquareInt(const int32 Value, int32& SquaredValue);
MyActor.cpp
void AMyActor::SquareInt(const int32 Value, int32& SquaredValue)
{
SquaredValue = Value * Value;
}
👇Outputを複数に増やすのも簡単。

記述の型
クラス名* 変数名*の後ろに&をつけるとOutputピンになる。
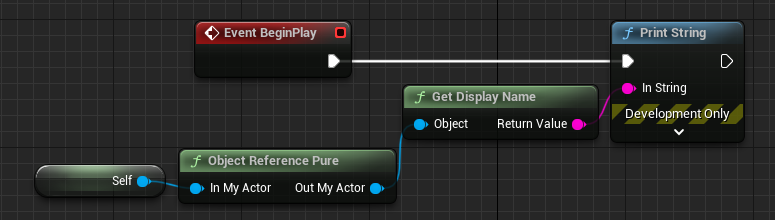
例入れたものを出すだけの簡単な仕事
MyActor.h
UFUNCTION(BlueprintPure, Category = "Actor Functions")
void ObjectReferencePure(AMyActor* InMyActor, AMyActor*& OutMyActor);
MyActor.cpp
void AMyActor::ObjectReferencePure(AMyActor* InMyActor, AMyActor*& OutMyActor)
{
OutMyActor = InMyActor;
}
Structureは、頭文字にFをつける。ベクトルは構造体の一種なので、VectorではなくFVectorになる。
これも型名の後ろに&をつけるとOutputピンになる。
例
MyActor.h
UFUNCTION(BlueprintPure, Category = "Actor Functions")
void InOutLocation(FVector InLocation, FVector& OutLocation);
MyActor.cpp
void AMyActor::InOutLocation(FVector InLocation, FVector& OutLocation)
{
OutLocation = InLocation;
}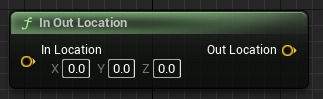
GetActorLocationとか作ってみたかったけど、コンパイルエラーになって妥協した。
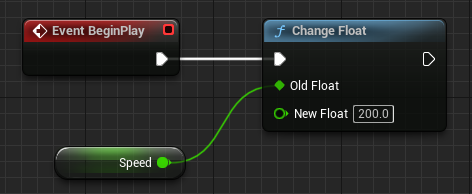
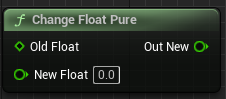
記述の型
UPARAM(ref) 型名& 変数名&はついているけどInputピンになる。
例
MyActor.h
UFUNCTION(BlueprintCallable, Category = "Actor Functions", meta=(HideSelfPin="true"))
void ChangeFloat(UPARAM(ref) float& OldFloat, float NewFloat);
MyActor.cpp
void AMyActor::ChangeFloat(float& OldFloat, float NewFloat)
{
OldFloat = NewFloat;
}
👇スピードの変更ができる。
👇こんなのも作ってみたけど、よく考えたらコレ実行できない。
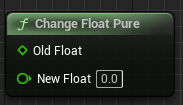
修正
その他
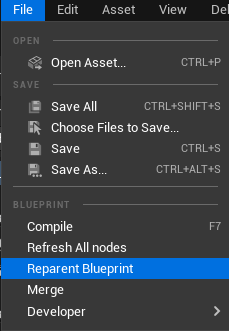
親のクラスを変更できる。便利。
File>Reparent Blueprint
意味要約

Object:U
Actor:A
Structure:F(今回はFVectorで使った)
Enum:E
その他:F
スネークケースと合わせて覚える。

意味中括弧(波括弧)
関連
丸括弧 (parentheses)、角括弧 (square bracket)
the open curly brace 開き中括弧
the close curly brace 閉じ中括弧
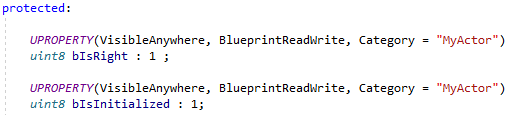
ヘッダーファイルの一番上にまとめて定義する。
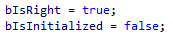
boolではなくuint8を使って、コンストラクタで値を初期化する。
MyActor.h
MyActor.cpp
変数として設定するより、関数の型として設定する方がいいらしい。理由は分からないけど、処理の重さとかかな。
良い例
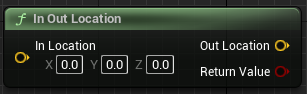
MyActor.h
UFUNCTION(BlueprintPure, Category = "Actor Functions")
bool InOutLocation(FVector InLocation, FVector& OutLocation);
MyActor.cpp
bool AMyActor::InOutLocation(FVector InLocation, FVector& OutLocation)
{
OutLocation = InLocation;
return true;
}
良くない例
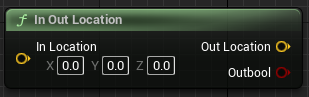
MyActor.h
UFUNCTION(BlueprintPure, Category = "Actor Functions")
void InOutLocation(FVector InLocation, FVector& OutLocation, bool& Outbool);
MyActor.cpp
void AMyActor::InOutLocation(FVector InLocation, FVector& OutLocation, bool& Outbool)
{
OutLocation = InLocation;
Outbool = true;
}👇参考動画
Twitterしてます
ブログの更新をお知らせ
コメント