使用UE:Ver5.1.0
使用VS:VS2019
5.1.0からEnhanced Inputが推奨されるInput方法となったので調べてみました。

Enhanced Inputの基本
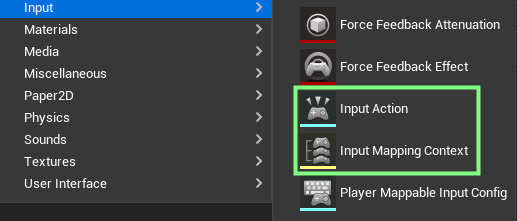
必要になるのは、Input Action(IA)とInput Mapping Context(IMC)の2つ。

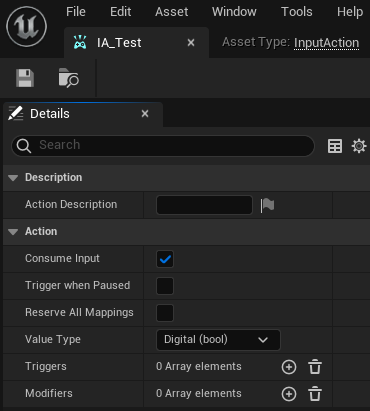
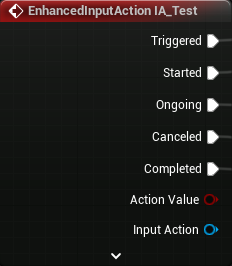
Input Action(IA)
動作それぞれに対してつくるもの。
動作についての詳細を記述できる。
詳しくは後で説明する。
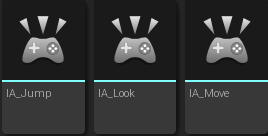
ThirdPersonのテンプレートでは、次の3つのInput Actionが用意されている。
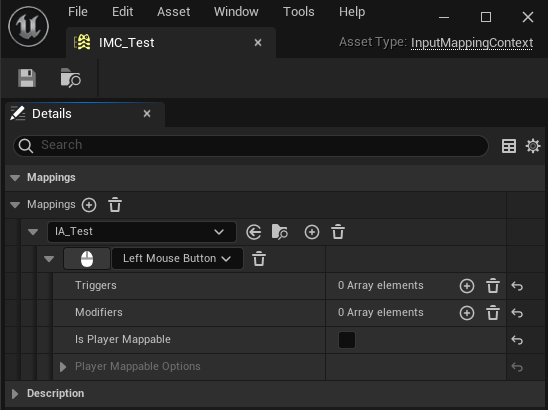
Input Mapping Context(IMC)
Input Actionを設定して、キーを結び付けるところ。
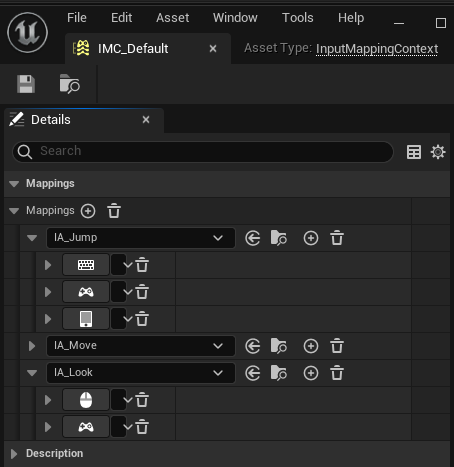
下はThirdPersonテンプレートのIMC。
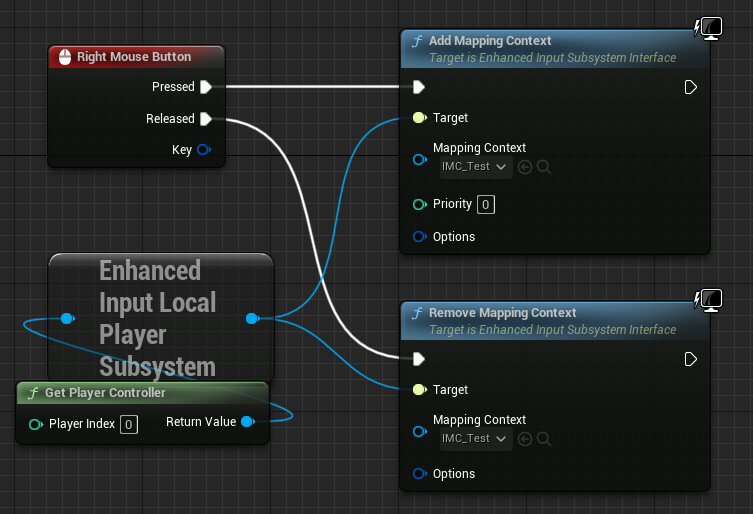
IMCの着脱
Add Mapping Contextにより、IMCが使用可能になる。
Remove Mapping Contextにより、IMCが使用不可能になる。
IMCが使用可能なときだけ、その中に設定されているIAが使用できる。
下の例だと、右のマウスを押しているときIMCが使用可能。
右のマウスを離すと使用不可能になる。
詳細設定
Input Actionにおいて設定できる、Value Type、Triggers、Modifiersの3つについて考える。
(TriggersとModifiersについてはIMCでも設定できる。)
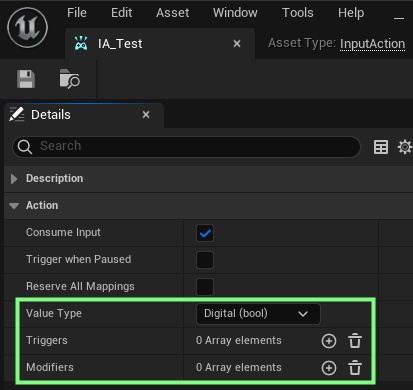
Value Type
Input ActionのValue Typeは、以下の4種類の変数型から選べる。
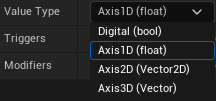
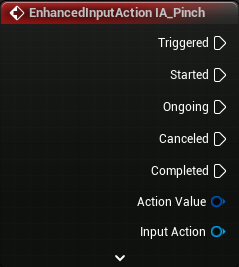
Value Typeで決めた変数の型が、イベントノードのAction Valueの変数の型になる。
実行ピンの数が以前より増えて戸惑う方もいると思う。
それはTriggersの設定と関係があるので、後に説明する。
ThirdPersonのテンプレートでValue Typeは、
IA_Jump:bool
IA_Move:Axis2D
IA_Look:Axis2D
となっている。
Jumpは飛ぶか飛ばないか2択なのでbool値。
MoveはForwardとRightの移動のためにAxis2D。
Lookは視点変更であり、YawとPitchの回転のためAxis2D。
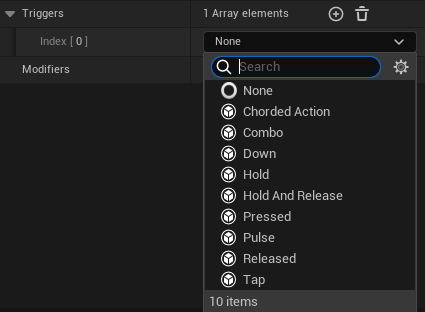
Triggers
次の10個から選択できる。
どのEventが実行されるかは、TriggerState(TState)というものの変化によって決まる。
TStateにはNone、Ongoing、Triggeredの3種類がある。
それらの変化の仕方で実行されるEventが決まる。
👇EnhancedPlayerInput.cppより抜粋したもの
// LastTState	 NewTState       Event

// None		 -> Ongoing	 = Started
// None		 -> Triggered	 = Started + Triggered
// Ongoing	 -> None	 = Canceled
// Ongoing	 -> Ongoing	 = Ongoing
// Ongoing	 -> Triggered	 = Triggered
// Triggered   -> Triggered	 = Triggered
// Triggered   -> Ongoing	 = Ongoing
// Triggered   -> None	  = Completed
TStateの変化の仕方については、実際試して理解した方が早そう。
上記のブログで行われていた可視化の方法を、自分で試してみて分かったことをまとめた。
TStateの変化の仕方はTriggersの設定によって異なる。
Triggersの設定ごとのTStateとEventについてまとめる。
括弧の中身がEventの種類で、その左に書いてあるのがTStateの変化である。
None
たぶんDownと同じ。DownがDefaultなのだと思う。
Down
キーを押す:None→Triggered(Started + Triggered)
押している間:Triggered→Triggered(Triggered)
キーを離す:Triggered→None(Completed)
Hold
キーを押す:None→Ongoing(Started)
押している間:Ongoing→Ongoing(Ongoing)
時間経過(Hold Time Threshold):Ongoing→Triggered(Triggered)
その後押している間:Triggered→Triggered(Triggered)
Ongoing時に離す:Ongoing→None(Canceled)
Triggered時に離す:Triggered→None(Completed)
Hold And Release
キーを押す:None→Ongoing(Started)
押している間:Ongoing→Ongoing(Ongoing)
離す(Hold Time Threshold未満):Ongoing→None(Canceled)
離す(Hold Time Threshold以上):Ongoing→Triggered→None(Triggered + Completed)
Pressed
キーを押す:None→Triggered→None(Started + Triggered + Completed)
キーを押し続ける:None→None(No Event)
キーを離す:None→None(No Event)
Pulse
キーを押す:None→Triggered→Ongoing(Started + Triggered + Ongoing)
キーを押し続ける:Ongoing→Ongoing(Ongoing)
時間経過ごと(Interval):Ongoing→Triggered→Ongoing(Triggered + Ongoing)
キーを離す:Ongoing→None(Canceled)
Released
キーを押す:None→Ongoing(Started)
キーを押し続ける:Ongoing→Ongoing(Ongoing)
キーを離す:Ongoing→Triggered→None(Triggered + Completed)
Tap
キーを押す:None→Ongoing(Started)
キーを押し続ける:Ongoing→Ongoing(Ongoing)
離す(Tap Release Time Threshold未満):Ongoing→Triggered→None(Triggered + Completed)
時間経過(Tap Release Time Threshold以上):Ongoing→None(Canceled)
Tap Release Time Threshold以上押し続ける:None→None(No Event)
離す(Tap Release Time Threshold以上):None→None(No Event)
その他のTrigger設定
難しそうなので保留。
Chorded Action
別のInput Actionをトリガーとするらしい。
Combo
良く分からない。
👇Comboで試したら、breakpointで止められた。
Modifiers
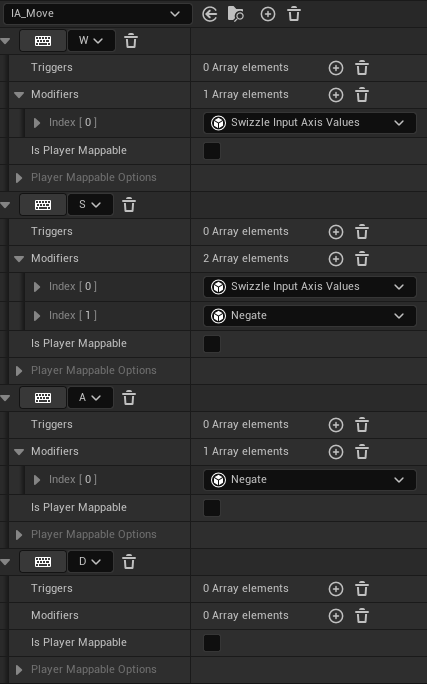
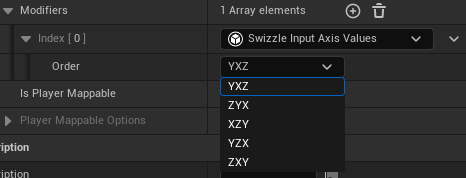
まずは、ThirdPersonテンプレートのIA_MoveのWSADに使われている2種類のModifierについて考える。
キーの入力(1次元の情報入力)に関して言えば、
値を入力する軸を決めるModifierだと理解して良いと思う。
OrderがYXZの場合、Y軸方向に入力。
ZYXの場合、Z軸に入力。
このModifierを使わない場合XYZ。XYZはX軸に入力。
IA_Moveをみると、
W(前)とS(後ろ)には、このModifierついている。
詳細を見てみると、OrderはYXZ(Y軸)になっている。
IA_MoveのValue TypeはAxis2Dであり、
WとSの入力は、Axis2DのY軸の値を決めていることが分かる。
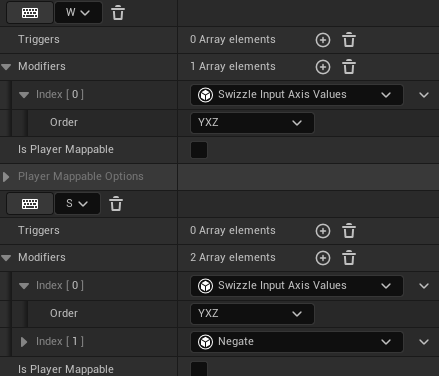
A(左)とD(右)には、このModifierはついていない。
これはOrderがXYZ(X軸)であることを示している。
つまりAとDの入力は、Axis2DのX軸の値を決めていることが分かる。
推測
WASDなどのキーは1次元の情報しか入力できないので、1番初めのOrderのみに意味がある。
例えばYXZならば、Yのみに意味がある。
GamepadのThumstickのように2次元以上の情報を入力できるようになると、順番に意味が出てくるのだと思う。
XYZ(X軸)、YXZ(Y軸)、ZYX(Z軸)のどれかを使うのが無難なのだと思う。
cyclicに並んでいないのはUEが左手系なのに由来すると思うが、良く分からない。
Swizzleの意味
To permute bits, or elements of a vector.
ビットや、ベクターの要素の順序を変えること。
(ここではベクター要素の順序を変える意味で使っている)
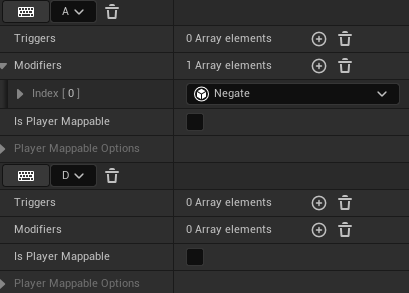
符号(正負)を反転させるModifier。
IA_Moveを見てみる。
W(前)にNegateはついていないが、S(後ろ)にはついている。
OrderがYXZなので、WもSもY軸の値を入力する。
Negateの有無と、WSのキー入力が正の値しかとらないことより、
WはAxis2DのY軸に正の値を入力し、
SはAxis2DのY軸に負の値を入力することが分かる。
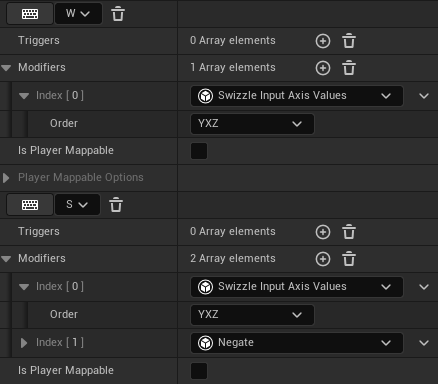
AとDについても同様に考えることで、
DはAxis2DのX軸に正の値を入力し、
AはAxis2DのX軸に負の値を入力することが分かる。
つぎに、同じIA_Moveに対するThumstickの入力について考える。
Thumstickの場合、これだけでAxis2Dの情報を入力できる。
Thumstickを倒す向きと入力値の関係はおそらく、
右:Axis2DのX軸に正の値を入力
左:Axis2DのX軸に負の値を入力
上:Axis2DのY軸に正の値を入力
下:Axis2DのY軸に負の値を入力
Swizzle Input Axis ValuesのModifierのOrderで順番を変えることはできそう。
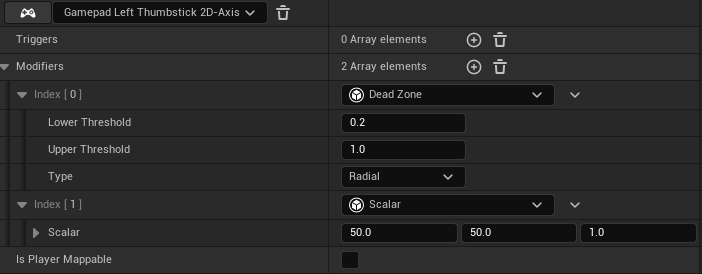
推測した効果
入力値をLower ThresholdとUpper Thresholdでクランプした後に、
(入力値 – Lower) ÷ (Upper – Lower)を計算したもの。
LowerとUpperの範囲外なら検知しない。(Type:Radial)
この推測のための検証は後の見出しで行っている。
IA_Move
Thumstickによる入力値の絶対値は、おそらく0から1の間の値をとる。
その大きさはThumstickの傾きに比例して大きくなる。
そのため傾けたつもりが無くても、微小に傾いていて微小な値が入力されてしまう。
そのような意図しない入力を避けるために使われているのだと思われる。
入力値のスケールを変更する。
入力が0から1の値をとる場合、Scaleを50にすると出力は0から50の値をとることになる。
👇公式ドキュメント

実装してみる
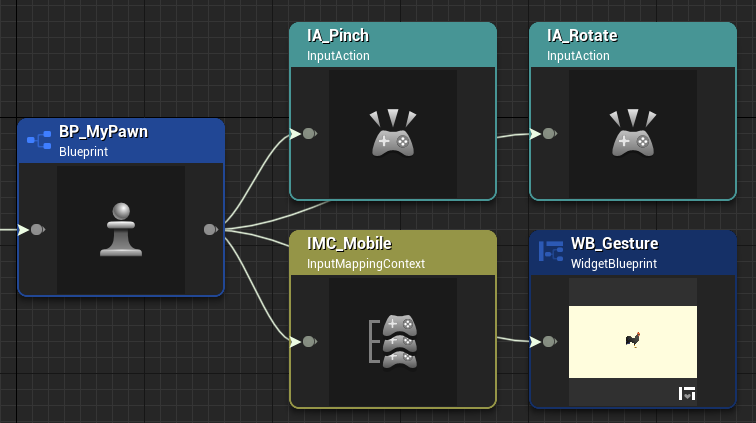
BlueprintでMobileのジェスチャーによる入力を実装してみる。
IMC_GestureというInput Mapping Contextを作成した。
中身はIA_Pinch、IA_Rotate、IA_Flickの3つ。(IA_Flickは実装失敗)
下準備
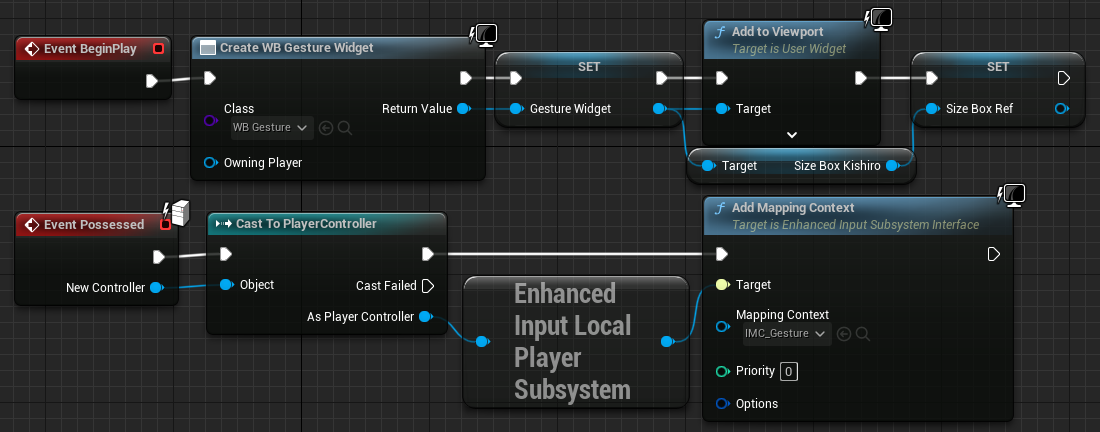
Project Settings
Enable Gesture Recognizer : true
CharacterなどへのキャストはReferenceが増えないので割と使う。
元から用意してあるクラスだからか、C++のクラスだからかは調べていない。
IA_Pinch
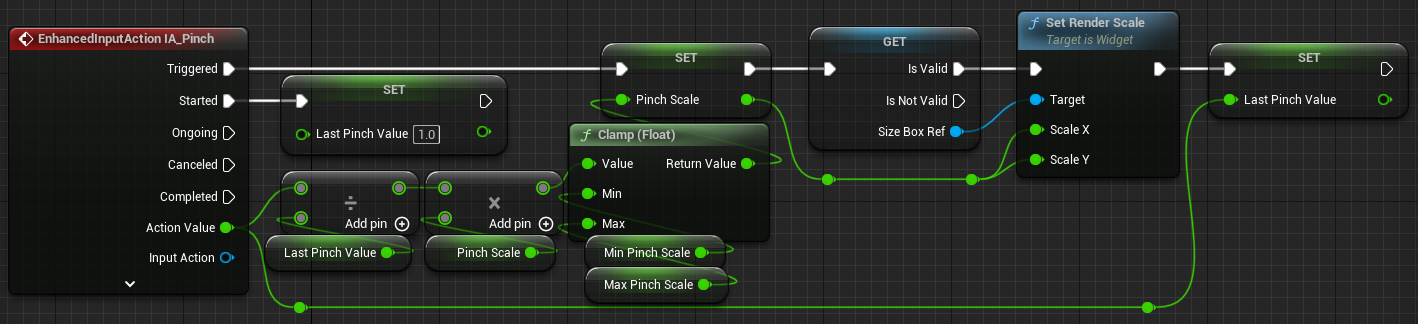
Modifierを使っていない場合、はじめに2本の指をおいた間隔でAction Value(Float)の値は1になる。
はじめの間隔を1として、指の間隔を広げると1より大きな値に、狭めると1より小さな値になる。
最大値は2を超えるが、最小値はおそらく0。
おそらく、はじめにおいた2本の指の間隔を1としたときの比を出力している。
Pinchの入力において、Dead ZoneのModifierの効果を少し調べてみた。
Type:Radial
case:1
Lower Threshold:0
Upper Threshold:2
初期間隔:0.5
最小値:0
最大値:1
case:2
Lower Threshold:0
Upper Threshold:4
初期間隔:0.25
最小値:0
最大値:1
case:3
Lower Threshold:1
Upper Threshold:5
初期間隔:検知されない
最小値:0
最大値:1
case:4
Lower Threshold:0.5
Upper Threshold:2.5
初期間隔:0.25
最小値:0(初期間隔の半分より狭くすると検知しなくなる)
最大値:1
case:5
Lower Threshold:0.8
Upper Threshold:1.3
初期間隔:0.4
最小値:0
最大値:1
推測した効果
入力値をLower ThresholdとUpper Thresholdでクランプした後に、
(入力値 – Lower) ÷ (Upper – Lower)を計算したもの。
LowerとUpperの範囲外なら検知しない。
IA_Rotate
Last Angleの初期値は0。
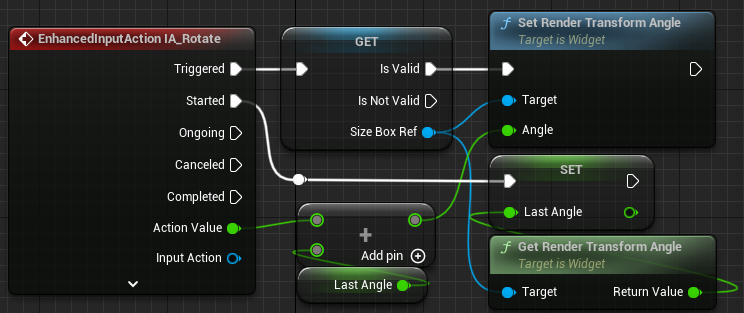
右回りで正の値を出力。左回りで負の値を出力。
90°の回転で90を出力。
UMGの要素を回転させるとき、
アンカーの種類によっては回転によりアンカーの基準が変わってしまうためか、回転の中心が期待した位置から変化してしまう。
IA_Flick
Action ValueをAxis2DにしてみたがXの値しかとれなかったので、今は実装をあきらめる。
下のブログが分かりやすそうだったので、参考させていただきタッチ系関数でいずれ実装したい。
その他の学び
5.1C++
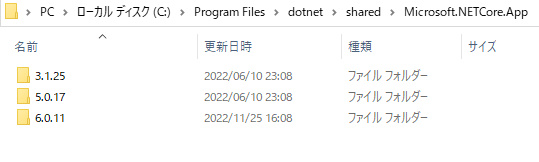
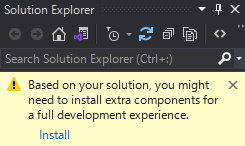
5.1でC++のプロジェクトを作ろうとしたら、下記の表示がでた。

下のサイト(上記表示に書いてあるURL)に行くと、自動的にexeファイルがダウンロードされるので実行。

6.0.11が追加された。この状態ならばC++プロジェクトを作ることができた。
下の警告への対応。
install
インストール
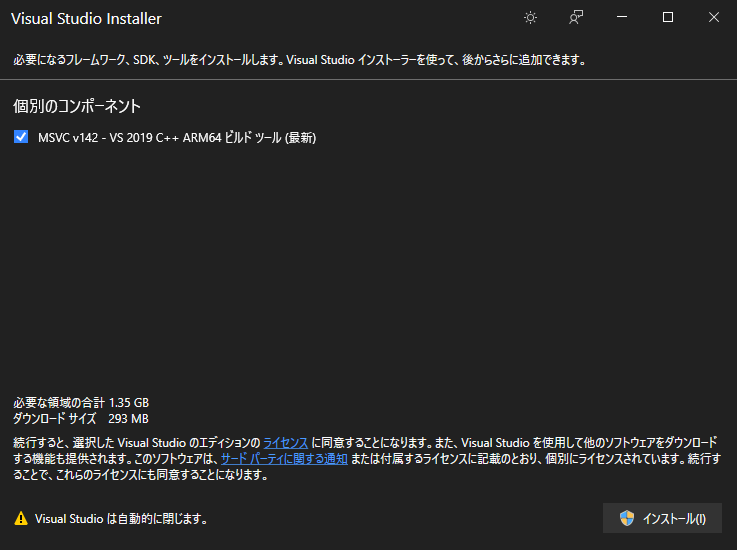
閉じる。特に問題は起こらなかった。
起きたエラー
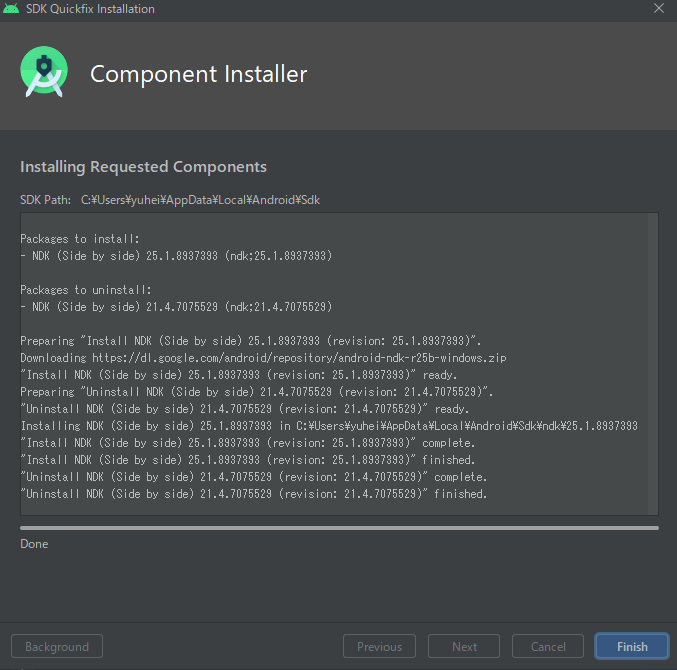
UEのVerを5.1にしてC++を使用した場合下記のエラーがでてAndroidで実機プレイできなかった。
(C++を使わない場合は実機プレイできた。)
LogPlayLevel: Error: UAT: ld.lld: error: undefined symbol: __aarch64_swp8_acq_rel解決方法
NDKのVerが古いのが原因。
Android Studio4.0をDefaultでインストールした状態から、NDKのVerを書き換える方法を下に示す。
Android StudioのVerが4.0でない人はこちらからinstall。
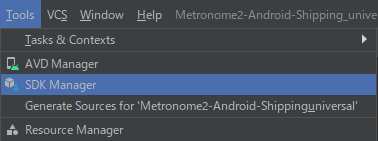
まず、任意のプロジェクトをAndroid Studioで開く。
上のメニューバーからTools>SDK Managerを選択する。
出てきたウィンドウの中で、SDKToolsのタブをクリック。

その後、Show Packge Detailsのチェックボックスにチェックを入れる。

25.1.8937393のVerにチェック。
以前のVerのチェックを外すことでuninstallできる。(任意)
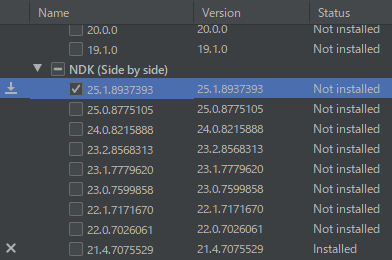
OKをクリック。
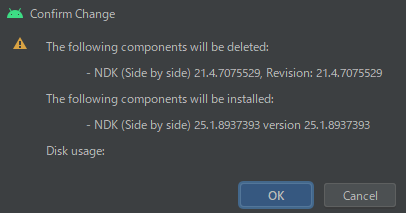
Finishをクリック。
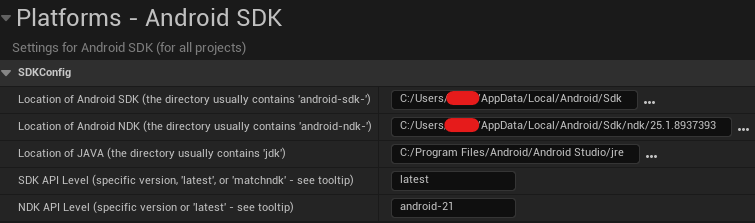
Project Settingsで忘れずに設定。
参考


Virtual Joystick
Project Settings>Engine>Input>Mobile
で設定できる。
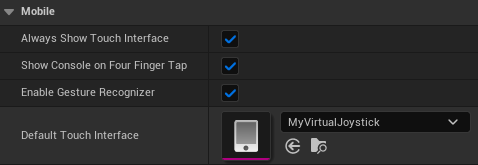
DefaultのInterface(Engine Content)をコピーして、自分用のInterfaceを作ればよいと思う。
VirtualJoystickのDefault設定
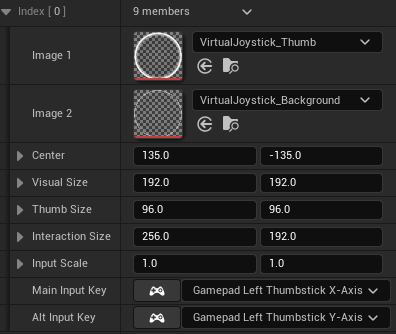
Center
Joystickの位置を決める。符号により初期位置が変わる。
左側の値:+の場合は画面左からの距離、-の場合は画面右からの距離。
右側の値:+の場合は画面上からの距離、-の場合は画面下からの距離。
Activate Touch Interfaceを使用する。
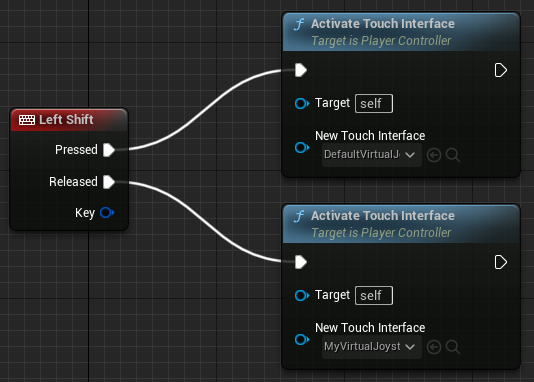
FCoreDelegates
// Fill out your copyright notice in the Description page of Project Settings.

#pragma once

#include "CoreMinimal.h"
#include "GameFramework/Pawn.h"
#include "MyMobilePawn.generated.h"

UCLASS()
class METRONOME_API AMyMobilePawn : public APawn
{
	GENERATED_BODY()

public:
	// Sets default values for this pawn's properties
	AMyMobilePawn();

protected:

	// Called when the game starts or when spawned
	virtual void BeginPlay() override;


public:

	// Called every frame
	virtual void Tick(float DeltaTime) override;

	// Called to bind functionality to input
	virtual void SetupPlayerInputComponent(class UInputComponent* PlayerInputComponent) override;

	UFUNCTION(BlueprintImplementableEvent)
	void OnApplicationWillDeactivate();

	UFUNCTION(BlueprintImplementableEvent)
	void OnApplicationWillEnterBackground();

	UFUNCTION(BlueprintImplementableEvent)
	void OnApplicationHasEnteredForeground();

	UFUNCTION(BlueprintImplementableEvent)
	void OnApplicationHasReactivated();

	UFUNCTION(BlueprintImplementableEvent)
	void OnApplicationWillTerminate();

};// Fill out your copyright notice in the Description page of Project Settings.
#include "MyMobilePawn.h"
// Sets default values
AMyMobilePawn::AMyMobilePawn()
{
// Set this pawn to call Tick() every frame. You can turn this off to improve performance if you don't need it.
PrimaryActorTick.bCanEverTick = true;
}
// Called when the game starts or when spawned
void AMyMobilePawn::BeginPlay()
{
FCoreDelegates::ApplicationWillDeactivateDelegate.AddUObject(this, &AMyMobilePawn::OnApplicationWillDeactivate);
FCoreDelegates::ApplicationWillEnterBackgroundDelegate.AddUObject(this, &AMyMobilePawn::OnApplicationWillEnterBackground);
FCoreDelegates::ApplicationHasEnteredForegroundDelegate.AddUObject(this, &AMyMobilePawn::OnApplicationHasEnteredForeground);
FCoreDelegates::ApplicationHasReactivatedDelegate.AddUObject(this, &AMyMobilePawn::OnApplicationHasReactivated);
FCoreDelegates::ApplicationWillTerminateDelegate.AddUObject(this, &AMyMobilePawn::OnApplicationWillTerminate);
Super::BeginPlay();
}
// Called every frame
void AMyMobilePawn::Tick(float DeltaTime)
{
Super::Tick(DeltaTime);
}
// Called to bind functionality to input
void AMyMobilePawn::SetupPlayerInputComponent(UInputComponent* PlayerInputComponent)
{
Super::SetupPlayerInputComponent(PlayerInputComponent);
}
雑多な学び
ThirdPersonのC++プロジェクトを参考に、試しに実装しようとした。
InputActionValue.hのincludeがないとエラーが出て諦めた。
.h file
#pragma once

#include "CoreMinimal.h"
#include "GameFramework/Character.h"
#include "InputActionValue.h"
#include "ThirdPersonPracticeCharacter.generated.h"


UCLASS(config=Game)
class AThirdPersonPracticeCharacter : public ACharacter
{
	GENERATED_BODY()

	/** Camera boom positioning the camera behind the character */
	UPROPERTY(VisibleAnywhere, BlueprintReadOnly, Category = Camera, meta = (AllowPrivateAccess = "true"))
	class USpringArmComponent* CameraBoom;

	/** Follow camera */
	UPROPERTY(VisibleAnywhere, BlueprintReadOnly, Category = Camera, meta = (AllowPrivateAccess = "true"))
	class UCameraComponent* FollowCamera;

	/** MappingContext */
	UPROPERTY(EditAnywhere, BlueprintReadOnly, Category = Input, meta = (AllowPrivateAccess = "true"))
	class UInputMappingContext* DefaultMappingContext;

	/** Jump Input Action */
	UPROPERTY(EditAnywhere, BlueprintReadOnly, Category = Input, meta = (AllowPrivateAccess = "true"))
	class UInputAction* JumpAction;

	/** Move Input Action */
	UPROPERTY(EditAnywhere, BlueprintReadOnly, Category = Input, meta = (AllowPrivateAccess = "true"))
	class UInputAction* MoveAction;

	/** Look Input Action */
	UPROPERTY(EditAnywhere, BlueprintReadOnly, Category = Input, meta = (AllowPrivateAccess = "true"))
	class UInputAction* LookAction;

public:
	AThirdPersonPracticeCharacter();


protected:

	/** Called for movement input */
	void Move(const FInputActionValue& Value);

	/** Called for looking input */
	void Look(const FInputActionValue& Value);


protected:
	// APawn interface
	virtual void SetupPlayerInputComponent(class UInputComponent* PlayerInputComponent) override;

	// To add mapping context
	virtual void BeginPlay();

public:
	/** Returns CameraBoom subobject **/
	FORCEINLINE class USpringArmComponent* GetCameraBoom() const { return CameraBoom; }
	/** Returns FollowCamera subobject **/
	FORCEINLINE class UCameraComponent* GetFollowCamera() const { return FollowCamera; }
};
#include "ThirdPersonPracticeCharacter.h"
#include "Camera/CameraComponent.h"
#include "Components/CapsuleComponent.h"
#include "Components/InputComponent.h"
#include "GameFramework/CharacterMovementComponent.h"
#include "GameFramework/Controller.h"
#include "GameFramework/SpringArmComponent.h"
#include "EnhancedInputComponent.h"
#include "EnhancedInputSubsystems.h"

//////////////////////////////////////////////////////////////////////////
// AThirdPersonPracticeCharacter

AThirdPersonPracticeCharacter::AThirdPersonPracticeCharacter()
{
	// Set size for collision capsule
	GetCapsuleComponent()->InitCapsuleSize(42.f, 96.0f);

	// Don't rotate when the controller rotates. Let that just affect the camera.
	bUseControllerRotationPitch = false;
	bUseControllerRotationYaw = false;
	bUseControllerRotationRoll = false;

	// Configure character movement
	GetCharacterMovement()->bOrientRotationToMovement = true; // Character moves in the direction of input...
	GetCharacterMovement()->RotationRate = FRotator(0.0f, 500.0f, 0.0f); // ...at this rotation rate

	// Note: For faster iteration times these variables, and many more, can be tweaked in the Character Blueprint
	// instead of recompiling to adjust them
	GetCharacterMovement()->JumpZVelocity = 700.f;
	GetCharacterMovement()->AirControl = 0.35f;
	GetCharacterMovement()->MaxWalkSpeed = 500.f;
	GetCharacterMovement()->MinAnalogWalkSpeed = 20.f;
	GetCharacterMovement()->BrakingDecelerationWalking = 2000.f;

	// Create a camera boom (pulls in towards the player if there is a collision)
	CameraBoom = CreateDefaultSubobject<USpringArmComponent>(TEXT("CameraBoom"));
	CameraBoom->SetupAttachment(RootComponent);
	CameraBoom->TargetArmLength = 400.0f; // The camera follows at this distance behind the character
	CameraBoom->bUsePawnControlRotation = true; // Rotate the arm based on the controller

	// Create a follow camera
	FollowCamera = CreateDefaultSubobject<UCameraComponent>(TEXT("FollowCamera"));
	FollowCamera->SetupAttachment(CameraBoom, USpringArmComponent::SocketName); // Attach the camera to the end of the boom and let the boom adjust to match the controller orientation
	FollowCamera->bUsePawnControlRotation = false; // Camera does not rotate relative to arm

	// Note: The skeletal mesh and anim blueprint references on the Mesh component (inherited from Character)
	// are set in the derived blueprint asset named ThirdPersonCharacter (to avoid direct content references in C++)
}

void AThirdPersonPracticeCharacter::BeginPlay()
{
	// Call the base class
	Super::BeginPlay();

	//Add Input Mapping Context
	if (APlayerController* PlayerController = Cast<APlayerController>(Controller))
	{
		if (UEnhancedInputLocalPlayerSubsystem* Subsystem = ULocalPlayer::GetSubsystem<UEnhancedInputLocalPlayerSubsystem>(PlayerController->GetLocalPlayer()))
		{
			Subsystem->AddMappingContext(DefaultMappingContext, 0);
		}
	}
}

//////////////////////////////////////////////////////////////////////////
// Input

void AThirdPersonPracticeCharacter::SetupPlayerInputComponent(class UInputComponent* PlayerInputComponent)
{
	// Set up action bindings
	if (UEnhancedInputComponent* EnhancedInputComponent = CastChecked<UEnhancedInputComponent>(PlayerInputComponent)) {

		//Jumping
		EnhancedInputComponent->BindAction(JumpAction, ETriggerEvent::Triggered, this, &ACharacter::Jump);
		EnhancedInputComponent->BindAction(JumpAction, ETriggerEvent::Completed, this, &ACharacter::StopJumping);

		//Moving
		EnhancedInputComponent->BindAction(MoveAction, ETriggerEvent::Triggered, this, &AThirdPersonPracticeCharacter::Move);

		//Looking
		EnhancedInputComponent->BindAction(LookAction, ETriggerEvent::Triggered, this, &AThirdPersonPracticeCharacter::Look);

	}

}

void AThirdPersonPracticeCharacter::Move(const FInputActionValue& Value)
{
	// input is a Vector2D
	FVector2D MovementVector = Value.Get<FVector2D>();

	if (Controller != nullptr)
	{
		// find out which way is forward
		const FRotator Rotation = Controller->GetControlRotation();
		const FRotator YawRotation(0, Rotation.Yaw, 0);

		// get forward vector
		const FVector ForwardDirection = FRotationMatrix(YawRotation).GetUnitAxis(EAxis::X);

		// get right vector
		const FVector RightDirection = FRotationMatrix(YawRotation).GetUnitAxis(EAxis::Y);

		// add movement
		AddMovementInput(ForwardDirection, MovementVector.Y);
		AddMovementInput(RightDirection, MovementVector.X);
	}
}

void AThirdPersonPracticeCharacter::Look(const FInputActionValue& Value)
{
	// input is a Vector2D
	FVector2D LookAxisVector = Value.Get<FVector2D>();

	if (Controller != nullptr)
	{
		// add yaw and pitch input to controller
		AddControllerYawInput(LookAxisVector.X);
		AddControllerPitchInput(LookAxisVector.Y);
	}
}下の定義が分かりやすい。
EnhancedPlayerInput.cpp(抜粋)
// NOTE: Enum order represents firing priority(lowest to highest) and is important as multiple keys bound to the same action may generate differing trigger event states.
enum class ETriggerEventInternal : uint8
{
	None,					// No significant trigger state changes occurred
	Completed,				// Triggering stopped after one or more triggered ticks										ETriggerState (Triggered -> None)
	Started,				// Triggering has begun																		ETriggerState (None -> Ongoing)
	Ongoing,				// Triggering is still being processed														ETriggerState (Ongoing -> Ongoing)
	Canceled,				// Triggering has been canceled	mid processing												ETriggerState (Ongoing -> None)
	StartedAndTriggered,	// Triggering occurred in a single tick (fires both started and triggered events)			ETriggerState (None -> Triggered)
	Triggered,				// Triggering occurred after one or more processing ticks									ETriggerState (Ongoing -> Triggered, Triggered -> Triggered)
};

ETriggerEventInternal UEnhancedPlayerInput::GetTriggerStateChangeEvent(ETriggerState LastTriggerState, ETriggerState NewTriggerState) const
{
	// LastTState	NewTState     Event

	// None		 -> Ongoing		= Started
	// None		 -> Triggered	= Started + Triggered
	// Ongoing	 -> None		= Canceled
	// Ongoing	 -> Ongoing		= Ongoing
	// Ongoing	 -> Triggered	= Triggered
	// Triggered -> Triggered	= Triggered
	// Triggered -> Ongoing		= Ongoing
	// Triggered -> None	    = Completed

	switch (LastTriggerState)
	{
	case ETriggerState::None:
		if (NewTriggerState == ETriggerState::Ongoing)
		{
			return ETriggerEventInternal::Started;
		}
		else if (NewTriggerState == ETriggerState::Triggered)
		{
			return ETriggerEventInternal::StartedAndTriggered;
		}
		break;
	case ETriggerState::Ongoing:
		if (NewTriggerState == ETriggerState::None)
		{
			return ETriggerEventInternal::Canceled;
		}
		else if (NewTriggerState == ETriggerState::Ongoing)
		{
			return ETriggerEventInternal::Ongoing;
		}
		else if (NewTriggerState == ETriggerState::Triggered)
		{
			return ETriggerEventInternal::Triggered;
		}
		break;
	case ETriggerState::Triggered:
		if (NewTriggerState == ETriggerState::Triggered)
		{
			return ETriggerEventInternal::Triggered;	// Don't re-raise Started event for multiple completed ticks.
		}
		else if (NewTriggerState == ETriggerState::Ongoing)
		{
			return ETriggerEventInternal::Ongoing;
		}
		else if (NewTriggerState == ETriggerState::None)
		{
			return ETriggerEventInternal::Completed;
		}
		break;
	}

	return ETriggerEventInternal::None;
}DeltaSecond
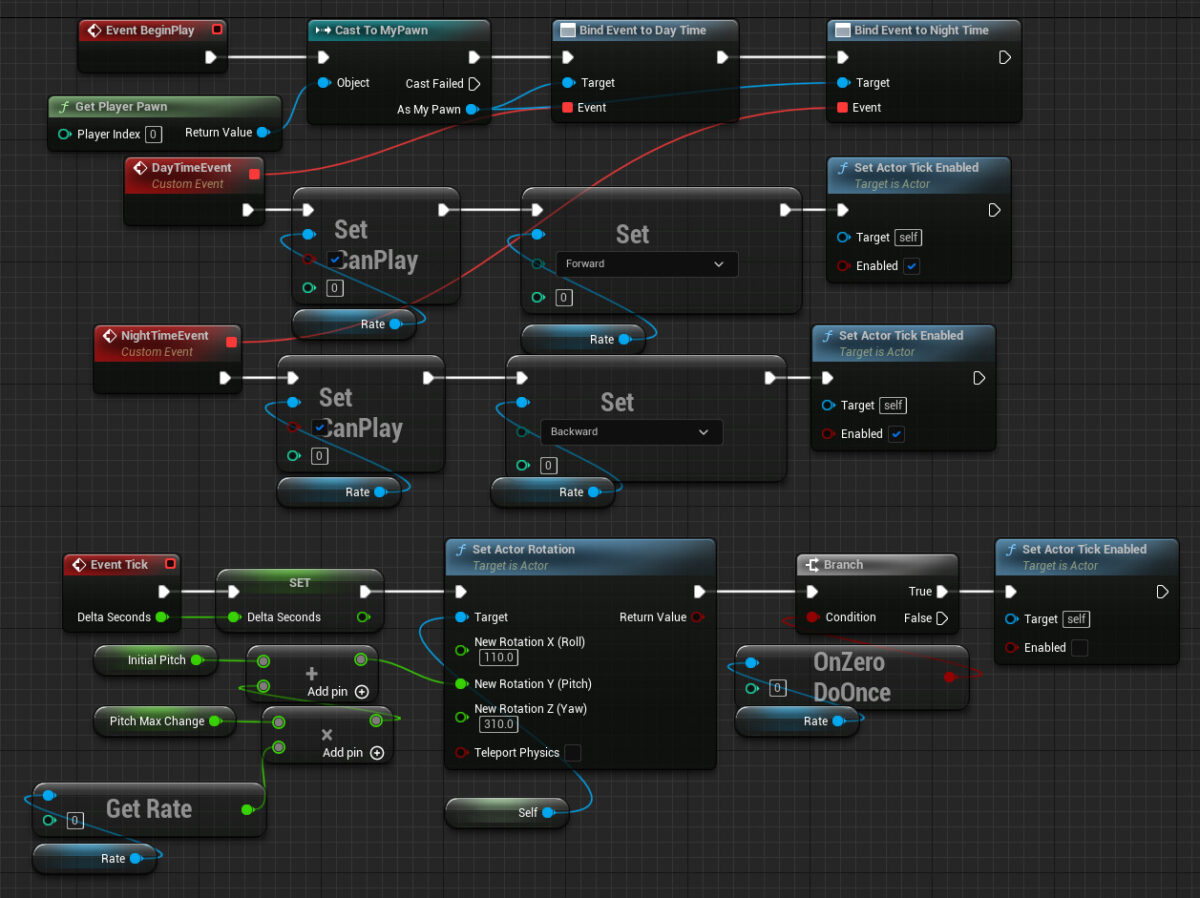
GetWorld()->DeltaTimeSecondsPawnからの指示で、Directional LightのRotationを変化させる処理。
結局使わなかったが記録しておく。
Directional LightのReferenceはGetするのが難しいので、Event Dispatcherが役に立った。
👇昔のInput(Enhanced Inputではない。)
今でもPlayerInputComponentやSetupPlayerInputComponentの関数は使われているが、このPlayerInputComponentの中身がEnhanced Input Componentになっているのだと思われる。
PawnのProtectedで定義されているvirtual Function。
どこで実行されているのかは調べられなかった。
とにかく、キーのインプットと関数を結び付けるのに使える。
Pawn.h
/** Allows a Pawn to set up custom input bindings. Called upon possession by a PlayerController, using the InputComponent created by CreatePlayerInputComponent(). */

virtual void SetupPlayerInputComponent(UInputComponent* PlayerInputComponent) { /* No bindings by default.*/ }使用例ThirdPersonのMoveForward
.h file
public:
virtual void ACPPThirdPersonCharacter::SetupPlayerInputComponent(class UInputComponent* PlayerInputComponent) override;
void MoveForward(float Value)
.cpp file
void ACPPThirdPersonCharacter::SetupPlayerInputComponent(class UInputComponent* PlayerInputComponent)
{
	PlayerInputComponent->BindAxis("Move Forward / Backward", this, &ACPPThirdPersonCharacter::MoveForward);
}

void ACPPThirdPersonCharacter::MoveForward(float Value)
{
	if ((Controller != nullptr) && (Value != 0.0f))
	{
		// find out which way is forward
		const FRotator Rotation = Controller->GetControlRotation();
		const FRotator YawRotation(0, Rotation.Yaw, 0);

		// get forward vector
		const FVector Direction = FRotationMatrix(YawRotation).GetUnitAxis(EAxis::X);
		AddMovementInput(Direction, Value);
	}
}
BindAxisと結びつける関数はfloat型の引数を持っていないといけないのかも。
” “の中身はProject Settingsのinputで設定した名前。
PlayerInputComponentの中のBindAxisの関数は引数を3つもつ。
詳しくは下記のコードで。
BindAxis
template<class UserClass>
FInputAxisBinding& BindAxis( const FName AxisName, UserClass* Object, typename FInputAxisHandlerSignature::TMethodPtr< UserClass > Func )
{
	FInputAxisBinding AB( AxisName );
	AB.AxisDelegate.BindDelegate(Object, Func);
	AxisBindings.Emplace(MoveTemp(AB));
	return AxisBindings.Last();
}デリゲート(wiki)
VS2022使えるみたい

構造体では初期値を入れていないと、実機プレイする際にエラーがでる。
(=0を入れていなくてエラーがでた。)
UPROPERTY(BlueprintReadOnly, Category = "ConvertRate")
float ConvertedRate = 0;Project Settingsにおいて、
Always show Touch Interface : true
Use Mouse for Touch : true
UQ3のプロジェクトをスマホの実機プレイをした結果
ボタンをPressした瞬間、他のボタンはReleaseされてしまう。
走れない。
ジャンプと歩く動作が反発して、たまに飛べない。方向転換ができない。
なぜか次のステージに行けない。
スマホは同時入力はできないから工夫が必要そう。
Chaos Destructionが効いた物体が消えている。
セーブは問題なくできている。
World上にPawnがいて、スタート時にそのPawnがPlayerControllerを所有しても、デフォルトPawnはSpawnされるみたい。PlayerStartもしくはカメラ位置から。
SetTextは、メインのウィジェットじゃないと上手くいかなかった。
メインのウィジェットに、USER CREATEDのウィジェットを足していく形でUIを作ろうとしていた。
USER CREATEDのウィジェットのテキストの中身を書き換えようとして失敗した。
詳しい条件などは調べていない。
UEのEditorとVSを閉じる
Exprolerからファイルを削除
.uprojectファイルを右クリック
Generate Visual Studio project files

スマホ実機プレイで自作プラグインが使えなかった。
RateComponentだけにしたら、同様のMessageがRateComponentにもでた。
対策方法はあるはずだが、しばらくは自作のプラグインは使わない方向で。重いし。
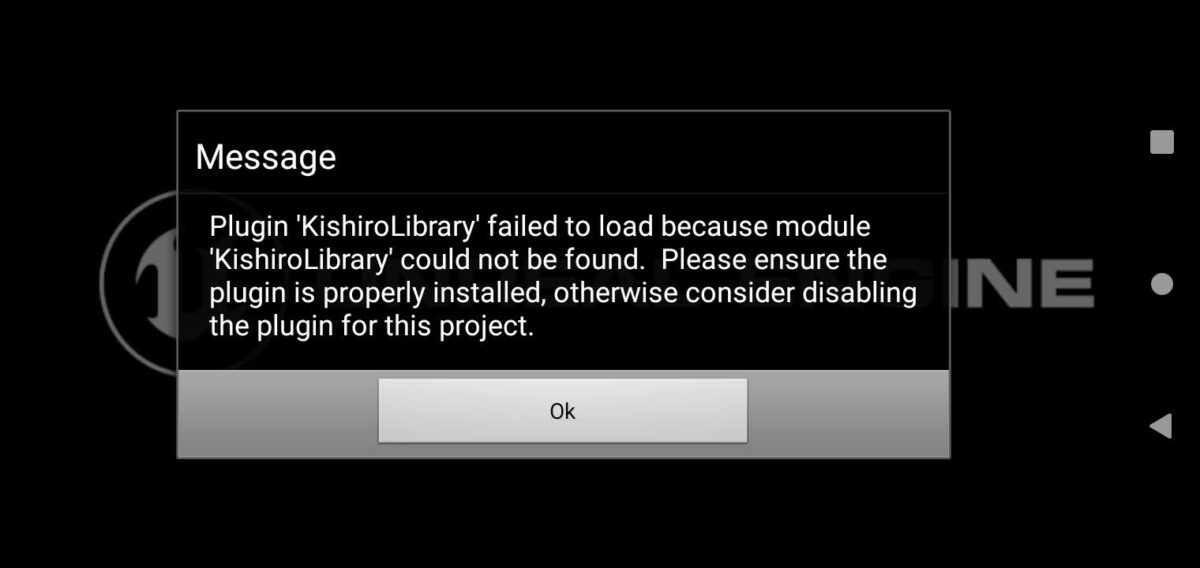
installedをtrueにしたが、変わらなかった。
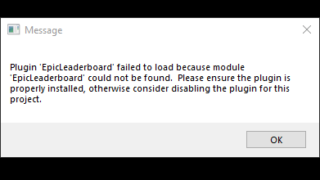
Windowsのパッケージ化をしてみても、同様のMessageが出た。
Android Studioの設定。
(Android Studioで、aabファイルの書き換えができないか考えたときの名残の知識。
aabファイルを作った後に書き換えるのは多分無理。)
これはやらなくても大丈夫。プロジェクトごとに設定するものだから、これを設定しても無駄だとわかった。
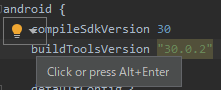
Android Studioを使ってみたところ、以下のエラーがでていたので修正した。
Installed Build Tools revision 32.0.0 is corrupted. Remove and install again using the SDK Manager.
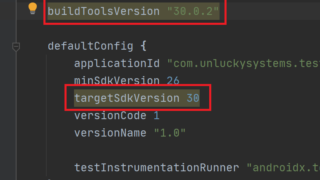
修正するのはbuild.gradleのandroidの部分。
修正前
android {
    compileSdkVersion 32
    buildToolsVersion "32.0.0"

    defaultConfig {
        applicationId "com.example.myapplication"
        minSdkVersion 16
        targetSdkVersion 32
        versionCode 1
        versionName "1.0"

        testInstrumentationRunner "androidx.test.runner.AndroidJUnitRunner"
    }
修正後
android {
    compileSdkVersion 30
    buildToolsVersion "30.0.2"

    defaultConfig {
        applicationId "com.example.myapplication"
        minSdkVersion 16
        targetSdkVersion 30
        versionCode 1
        versionName "1.0"

        testInstrumentationRunner "androidx.test.runner.AndroidJUnitRunner"
    }
左側に電球アイコンがあったので、クリックしてSync Nowを選んだらエラーが消えた。
これを修正することで、Image Assetを使えるようになった。(アイコンづくりに使えるもの)
👇参考
Win + V
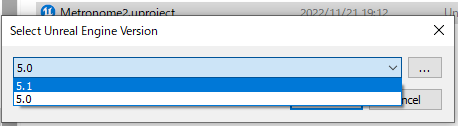
.uprojectの上で右クリック。
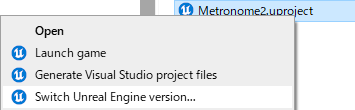
変更したいVersionを選ぶ
👇ListViewについて

僕はTileViewを作成してみた。作り方は同じ。
初見ならば上の記事を読むべき。処理負荷などについても調べてくれていて面白いし、分かりやすい。
👇これは自分が忘れたときに思い出す用。上の記事をまねただけのもの。モバイルでのドラッグ&ドロップ実装のために調べてみた。
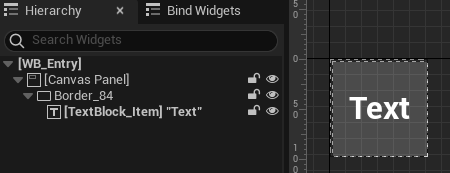
WB_Entry
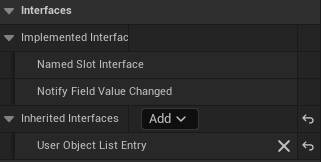
WB_TileView

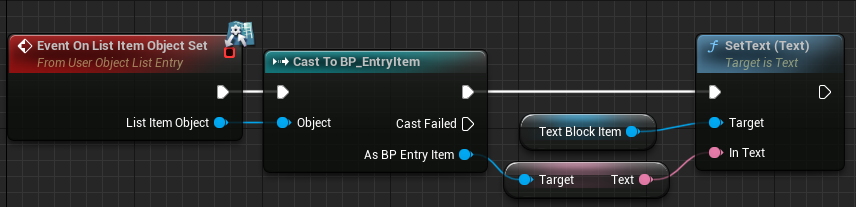
Construct BP Entry ItemはClassにObjectを入れたもの。Actorを入れると上手くいかなかった記憶アリ。
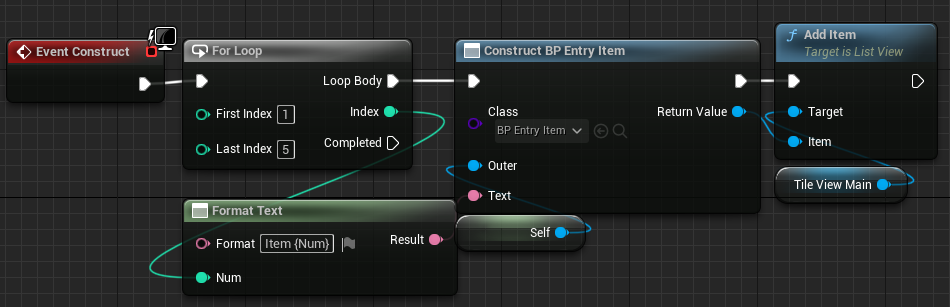
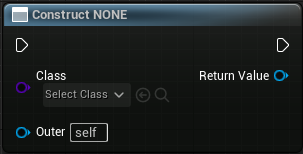
BP_EntryItemは特に処理を記述していないObject。
ただTextを持たせているのみ。

フォルダを移動しろってこと?とりあえず無視しておく。
いつかHoudini試してみたい。
Twitterしてます
ブログの更新をお知らせ
コメント